
Mike's Flight Deck is an introduction to home cockpit building, the hobby that takes off where flight simulation game software ends. When staring at a 17" monitor on a crowded desk, and pushing, pulling and twisting a wimpy joystick just doesn't do any more, it's time to build a simulated cockpit or flight deck. This site offers information on how to do just that.
Mike's Flight Deck is also home to Mike's Flight Deck Books, a very small company that sells the books I've written about building flight simulators. So far I've written and published two trade paperback books and the first three eBooks in "The Mike's Flight Deck Guide" series.
Clicking on a cover image will take you to the information/order page for the respective book.


** Note: A few copies of Building Recreational Flight Simulators are still available and can be purchased HERE.**
What's New:
Using CAN Bus for Flight Simulation (28 June 2024)
CAN is a lightweight, inexpensive networking technology that you can use to simplify wiring in a simpit. If you're using some of the more recent micro controllers (ESP32, Feather CAN, Arduino UNO R4) you already have built in CAN capability. If not, a low cost ($3~4) module can add it. For some reason CAN seems to be almost unknown in the DIY flight sim world. My latest book, Using CAN Bus for Flight Simulation, aims to change that.
Using CAN Bus covers the essentials of CAN then walks you through a project that shows how to to connect instruments, switches, and LEDs to a Cessna 172 in X-Plane (or other planes & sims).

Using CAN Bus is available as an eBook from Amazon. Clicking on the cover will take you to the eBook's purchase page.
Micro-stepping a Switec (26 May 2024)
I revisited the design of the instrument in the "Building Single Pointer Instruments" eBook. The issue is that the Switec movement used in the instrument is a bit too noisy and jerky when driven by the spec sheet official step pattern.
These movements make noise and produce less than smooth needle motion because they contain a two-stage gear train with significant backlash. The abrupt shaft movement from the stepping motor bangs the gear teeth together and jerks the needle. The solution is taming the stepping motor shaft movement through micro-stepping.
Switec movments are widely used in cars where they perform quite well, but car manufacturers have access to specialized micro-stepping chips, something that is expensive and hard to get in the hobby world. The stepping motor inside the Switec is a "Lavet" type motor which is different from the types of stepping motors typically used by the hobby community. The micro-stepping motor drivers we might typically turn to don't work well with Switec or similar movements. (Plus, they cost too much.)
The processor chip used in the Arduino is capable of generating micro-stepping patterns for the Switec, but we have to tweak its setup a bit to get it up to speed.
The Arduino Nano has three timers each capable of producing two PWM outputs which can be used for micro-stepping. Timer 0 is used by the millis function so is not available because that function is needed to set the motor step timing. Timer 2 shares I/O pins with the SPI functionality which is needed elsewhere. Fortunately, timer 1 can be co-opted for motor control. The analogWrite function will produce a PWM signal but at too low a frequency. The Switec needs something around 30kHz . Fortunately nothing else is attempting to use timer 1 so a direct write to the timer 1 control register will work to select a suitably high clock frequency. A data sheet from a Switec competitor provided the final bit of info needed to develop a micro-stepping sequence.
Micro-stepping results in significantly smoother and quieter needle movement. It's a big enough improvement that I'll likely release a second edition of the single pointer instrument e-book. This will also be an opportunity to include a third sketch showing how to use CAN with a sim instrument.
CAN Bus (26 May 2024)
CAN is a lightweight networking protocol that is optimized for broadcasting small data packets among a small group of devices. Developed for the automotive industry several decades ago, its use has expanded widely. CAN is increasingly seen as a standard peripheral alongside USB, SPI, Wi-Fi, etc. CAN is easy enough to add by using a cheap daughter board, and recent offerings from Arduino, AdaFruit, and others have CAN built in.
CAN works well in DIY flight sim applications. It basically does the same things in a simpit that it been doing in cars: carrying engine data from the ECU to the dashboard instruments and relaying manually operated switch events to the appropriate chunk of electronics in the car. We just need to change a few names. "Dashboard" becomes "main instrument panel", and "chunk of electronics" becomes "sim computer". Really, that's all there is to it. Mostly.
There are a few minor details to stumble through. The car ECU speaks CAN natively. The sim computer has a preference for USB. And once you're in the USB realm, there's still that leap from the OS to the commands and data within the simulation itself. Details. Minor... Mostly.
And actually, it is fairly easy to bridge the gap between CAN and USB. The data packets are small, and there is no addressing or routing. A gateway consisting of an Arduino Nano and an MCP2515 CAN bus daughterboard can handle it.

Software angst is largely eliminated by using Air Manager to gain access to flight simulation data values and to push commands into the simulation. Even better, it's got a utility called Message Port that supports communication with Arduinos plugged into the simulation computer. Air Manager and Message Port allow you pretty much ignore the computer OS. The Arduino sketch simply shuttles data between the CAN library code and the Message Port library code with a bit of buffering to handle timing differences. Sourcing data from the simulation and sending it commands are controlled by a Lua script run within Air Manager in the simulation computer.
To test this, I built up a basic instrument panel of six instruments, eight toggle switches, and three LEDs (outer, middle, and inner marker beacon lights). The Lua script ties these to a steam gauge Cessna 172 in X-Plane 12. Seems to work.
Digital Inputs Using CAN Bus (6 April 2023)
A friend has a sim project with a few hundred digital inputs, mostly manually operated switches. This is a great application for CAN Bus. CAN was developed by the automotive industry to simplify wiring of low speed switches and sensors. Since CAN is currently used in hundreds of millions of cars and trucks, the tech is well tested and cheap.
I knocked together a simple card that scans 64 inputs using an Arduino Nano. Any changes to the input lines result in a message being send out over the CAN bus. A gateway unit receives the message and passes it over USB to the simulation computer. If there are no changes to inputs there are no messages and no loading on the simulation computer.
This is a simple design using widely available, low-cost parts. The Nano scans the inputs one at a time using eight, eight-to-one multiplexers to expand on the Nano's limited I/O pin count.

Cheaper Digital to Synchro Converter (18 February 2023)
Cheap DTS works, and surprisingly, hasn't blown up anything yet though I keep trying. I thought by now at least one of the amplifier modules would have expired but not yet.
The code is slowly morphing into a cleaner more documented state as testing progresses. The stand alone test sketch is no more. Instead there is a built in test mode to a sketch that accepts inputs through USB and CAN Bus. A SimInnovations Air Manager connection is on the list, somewhere downstream.
The unit can synchronize to an external 400Hz power source. This isn't needed for simple synchro receiver style gauges but is useful for servo-ed instruments that take synchro inputs and require more power than this DTS version can supply. Synchronizing is done with a software phase lock loop.
Next on the list: more testing, Air Manager code, and writing, lots of writing. I'd like to get this into an Ebook and move on to another project.
Cheaper Digital to Synchro Converter (23 December 2022)
Asking an 8-bit, 16-MHz Arduino to produce three 400-Hz sine waves with 48 samples per cycle is possible as long as you don't expect much else. Since there are other tasks to be done, a different approach has been taken: two samples per cycle followed by a lot of filtering. The hardware cost is slightly cheaper. There's one less chip, fewer resistors, but a few more caps, a difference of a few pennies. Software is not too different. It mostly just runs less frequently using less data, leaving a lot more processor time available for other tasks. Essentially, it's generating two square waves with variable amplitudes and one with a fixed amplitude. All three are filtered by four-pole low pass filters to produce clean sine waves.
The output voltage from the amplifier modules is limited to about 40% of the nominal synchro rating. A higher voltage would produce more torque, but the test synchro operates well.

The next steps are testing operation with lower frequencies to boost synchro torque, testing with larger synchros, and getting the CAN Bus connection working.
Cheaper Digital to Synchro Converter (3 December 2022)
The project has an updated circuit board. It pulls everything onto a single board and improves an input that samples a reference 400 Hz signal.

This is still in the proof of concept stage. It works in that it can make a synchro operate, but to be useful, it has to also communicate effectively while doing so. There may be some issues there.
The inner synchro loop in the sketch is interrupt driven by a timer. The interrupt service routine loads three digital to analog converters that produce the synchro signals. The ISR timing is critical to producing clean waveforms. Aggregate ISR execution takes up about 40% of the Arduino's time. The remaining 60% is enough to handle everything else as long as the timer interrupts get priority, and that's not a given.
Ideally, the device would be able to communicate through a choice of channels: USB as a virtual serial port, CAN Bus, and USB under the control of a utility like Sim Innovations Air Manager. Since these services almost certainly make use of interrupts there's the very real possibility that competing ISRs will get in the way of the synchro signal generating loop.
Part of the appeal of this project is seeing just how far the venerable Arduino can be pushed. There are certainly better choices available today. The imported Nanos had a real cost advantage for a number of years, but that's pretty much history now. Still, I like the Nano, and I'll push it a bit more in upcoming tests, but if it can't hack it there are ESP32s and Pi Picos on my bench waiting their turns.
Cheaper Digital to Synchro Converter (17 November 2022)
This project got started by asking what's the cheapest way to connect a single, synchro based gauge to a sim. It's a question that's been asked before, but parts cost increases and availability problems keep changing the answer. Plus, those little class D amplifier boards keep calling out, begging to be used in a different, non-audio application.
A synchro based engine gauge uses perhaps 2 or 3 watts of 400 Hz power. This is a simple gauge that's little more than a synchro receiver with a pointer on the shaft. Class D amplifier boards capable of supplying 30 watts cost only a few dollars. Using one of these boards to produce power for the gauge seemed like a great way to avoid the cost of a 400 Hz power supply. Better yet, the 400 Hz signal driving the amp could be generated by the synchro converter which would simplify the design. There would be no need to worry about synchronizing the synchro signal generation with an external 400 Hz power source.
The basic idea is to use an Arduino Nano and three digital to analog converters (DACs) to generate three 400 Hz sine waveforms. Two would be used to make sin and cos synchro components that could be combined to form the synchro stator signals while the third would be amplified to become a source of 400 Hz power. Inexpensive class D amplifiers, like the one pictured below, would provide the needed power levels. Seems like a great concept, but of course, there are some caveats.

A glaring issue is that the amplifiers are designed for low impedance loads like 4 ohm speakers, so you get power delivered at higher than needed currents and lower than desired voltages. The largest output swing is around 40 volts, (and that's when the amplifier's overvoltage safety feature is turned off). A synchro rotor typically needs 26 volts, but that's an RMS value, a type of average. The peak to peak swing is 73 volts.
There are several ways to approach this. You could just use step up transformers. This unfortunately adds weight and expense.
OR, you could operate the system at a lower frequency. The problem with the lower voltage is that it pushes less current through the synchro. The synchro's ability to rotate a pointer inside the gauge depends on torque generated by that current. Less current means less torque which means a reduced capability swinging pointers. But, if you lower the operating frequency, the synchro windings present lower impedances to the voltage, so more current flows, and the torque is restored, or at least, increased.
OR, you could just ignore the problem. Synchro gauges are designed to operate reliably in aircraft with hundreds of feet of wiring. The actual voltage that gets to the gauge can be well below the nominal rated voltage, and the gauge keeps on working. Using the gauge in a sim with much shorter connecting wires means there won't be voltage loss from long wires.
And then there's another caveat. Class D amplifiers typically have differential (bridged) outputs. An "output" is actually two outputs working together. The voltage on one goes higher while the other goes the same amount lower. The load, normally a speaker, is connected from one output to the other. When there is no output signal, both outputs sit at a voltage close to half the power supply voltage. It's the voltage difference between these outputs that delivers the output power.
This would seem to be a show stopper. After all, who wants to put DC on their synchro gauge? Turns out, that's not a problem, because the synchro isn't connected to electrical ground. The synchro only cares about voltage differences across its windings. If there are identical DC components on both ends of its windings, it simply doesn't matter. DC current only flows when there is a difference in voltage.
The differential outputs actually work to the benefit of the design. Synchro stator voltages must be generated with a 120 degree amplitude variation between lead pairs. If an amplifier is driven by Vsin, one output will be (0.5) AVsin while the other will be -(0.5)AVsin. "A" is the gain of the amplifier. If a second amplifier is driven by (1.732)Vcos, it's outputs will be (0.866)AVcos and -(0.866)AVcos. The benefit shows up when you measure the voltage from one output on the first amplifier and another output on the second amplifier. You get a vector addition (or difference) that produces the 120 degrees that the synchro needs.
When I designed the prototype, the availability of 8 bit DACs seemed problematic, so I made my own from 74HC595 shift registers (~$0.35 each) and a resistor network (~$0.015 each). There's a buffer and filter on each of three channels based on TL084 opamps (~$0.80 each). Add a few more dollars for the Nano, random parts, and the board.

Bottom line: it works. It supplies 10 volts RMS to the synchro rotor instead of the rated 26. The stator voltage are scaled down proportionally to keep the system in balance. Torque is low but adequate. Changing the operating frequency to 200 Hz noticeably boosts torque.
Digital to Synchro Converter (7 January 2022)
The new boards arrived two days ago, and one has been built up and successfully tested. The only problem appears to be typos on the silk screen layer. The heatsink warms to about 25 degrees F above ambient, so just warm to the touch. The next step is proper documentation.

Digital to Synchro Converter (27 December 2021)
The DTS prototype is functioning reasonably well though I have identified and corrected two issues, one thermal and the other electrical.
The first issue is that the LM1875 output amplifiers simply generate too much heat for the heat sinks I had hoped to use. The heat sinks are adequate as long as there is air blowing over them, but I've had second thoughts and want to at least reduce the need for moving air. At first I tried a DIY approach, making a larger heat sink from aluminum sheet and two bits of C-channel. That worked better, but a quick look online convinced me that buying a commercial heat sink (through Amazon, surprisingly) was cheaper and more convenient. This requires moving things around on the board, but as the board has an issue with the transformer placement which already requires revision, that's not a problem.

I stumbled upon the second issue while exploring options to reduce the voltage from the 400 Hz inverter. The suggestion from the manufacturer, load the inverter with an output resistor to establish a minimum load, was rather inconvenient. I needed 150 Ohms or less to get the voltage down to 26, and that dissipates a fair amount of heat. I don't have very many high power resistors so I was only getting a few dozen seconds of testing using what I had on hand before needing to let things cool. (Hmm, overheating again...) So I set up a transformer as a tapped auto-transformer. This got me 24.5 volts along with bursts of 300 KHz parasitic oscillations.
The DTS uses a sample of 400 Hz power to generate the synchro stator voltages. Apparently adding the auto-transformer changed the impedance looking into the inverter output enough to allow a feedback loop from the DTS outputs through the synchro via the rotor connection to the inverter then though a step down transformer used to sample the inverter voltage and back into the DTS. Disconnecting the rotor from the inverter stopped the oscillations. Fortunately, so did a simple RC filter at the 400Hz sample input on the DTS.
It only took a couple hours to revise the board design. It's back in the hands of the people at JLCPCB. In a week or so I should be able to build up the "final(??)" prototype.
Digital to Synchro Converter (12 December 2021)
The new DTS boards showed up from JLCPCB. Very pretty! Sadly (embarrassingly) I was reminded that beauty is only skin deep. I made a mistake in developing the PCB footprint for the isolation transformers, and they will not fit on the board together. And once I got the board assembled (as far as possible) I discovered a cooling problem with the output amplifiers. This caused me to reflect a bit on how synchros work.
It's important to remember that synchros are rotary transformers. If you put a voltage on one winding, you'll see voltages on the other windings. A synchro can be confusing because turning the rotor changes the transformer coupling between the rotor and stator windings. Further, the stator consists of three, interconnected windings. So, if you have a synchro with a 26 volt rotor and an 11.8 volt stator (a common standard), where is the 11.8 volts? Well, it's buried in the math. There's no way around it, you have to do a little math to figure out what voltages to place on the three stator connections to make the synchro operate properly. That said, if you do it right, there will be one rotational position of the rotor that will produce the specified rotor voltage on the rotor connections. If you were to connect the rotor in this position to a power source supplying this specified voltage, no current would flow thorough this connection because there would be no voltage difference. However, if the rotor is not in this position there would be a voltage difference and current flow which generates a magnetic force on the rotor that pushes it toward the zero current position.
But this zero current position only exists if the proper voltages are applied to the stator. If the stator voltages are too high, the rotor still rotates to the proper position, but the voltage from the rotor is too high and the synchro begins pushing power back into the power supply. If the stator voltages are too low, the power supply pushes power into the synchro and whatever electronics is connected to the stator. In either case, things start to get hot.
Let's take a look at a demonstration of this theory in action, for example, on my workbench.
I have a 24 volt, 400Hz static inverter that powers the synchro rotor and provides the 400 Hz voltage sample that the digital to synchro converter operates on. As it turns out, the 24 volt inverter actually puts out 28~29 volts. Additionally, my DC bench power supplies used to power the DTS were under performing, and the DTS output amps were being over driven. I added a voltage divider to reduce the 400Hz sample so I could verify DTS operation. I created a situation that put too much voltage on the rotor and far too little voltage on the stator. The rotor turned (good), the synchro got warm (bad), and the DTS output amplifiers got excessively hot (very bad).
My first response was to be disappointed that the heat sinks weren't up to the task. I spent some time doubling up the heat sinks. That helped, but also got me wondering (productively) why things were heating up. Once the rotor has properly positioned itself, there shouldn't be any power transfer in either direction. The amplifiers shouldn't have anything to do and shouldn't get hot. Eventually it occurred to me that I had created the problem myself.
I've corrected the voltage mismatch as well as I can with the power supplies I currently have. This has substantially reduced the overheating, and the synchro appears to function as expected. (There's an Arduino just out of the picture sending data to the DTS that makes the rotor spin slowly.) I have another power supply on order that will allow me to continue, and hopefully complete, the testing. I've already corrected the PCB transformer placement problem, but I'll wait on ordering more boards until I've completed this phase of testing.

Digital to Synchro Converter (27 November 2021)
I have the revised board design ready to send out for manufacturing. The rendering below gives an idea of what the assembled devise will look like minus the isolation transformers and heat sinks. This version reflects both design and packaging changes.
A major change in the design is to leave the discrete output amplifiers behind, replacing them with LM1875 audio power amps. I had thought these chips had been discontinued, but a visit to the TI website shows otherwise. I'm a little concerned about the price (they go for about $5, single quantity), but there are other options. The TDA2050 offers similar performance, and while no longer made by the original supplier, there is a Chinese clone available for under a dollar. I haven't tested this option yet, but I've got a few 2050s on order.
Packaging changed in a big way. There is no longer an Arduino or CANbus module on the board. It looks like it makes more sense to have a single Arduino controlling multiple DTS boards through what are essentially SPI connections. Removing the Arduino and CANbus module frees up a lot of board space, enough in fact to put a pair of isolation transformers on a board that is still small enough to fall within JLCPCB's "5 boards for $4" special pricing.

Digital to Synchro Converter (19 November 2021)
Aircraft instruments like an HSI don't pull much current from the synchro S1, S2, & S3 connections. These instruments rely on internal servo amps and motors to move the instrument mechanisms. However, simple gauges like a remote reporting oil pressure gauge don't have amps or motors. They depend directly on power from the synchro signals to operate a synchro receiver, and this can sometimes demand a surprisingly large amount of current. A digital to synchro converter must be able to meet the worst case demand.
One of the improvements I had hoped to make in this version of the DTS is a cost reduction in the amplifier that drives the synchro. I replaced a large power amplifier chip with a much cheaper opamp and a number of buffer transistors. This "works", but those little buffer transistors get pretty toasty at times. I'm not happy with this so it's time for Plan B: bring back the large power amplifier chip. <dramatic sigh>
In addition to verifying the basic functionality of the DTS, the set up below is a first test of a low cost commercial 400Hz inverter with the DTS. It's certainly possible to build a 400Hz power source, but at $125 for 40 Watts, it's hard to justify the effort. That's the black box in front of the scope. It's from Power Stream Technologies, and it's been happily supplying 400Hz electrons for my debugging efforts.
I've also been verifying the use of low cost 50/60Hz transformers for electrical ground isolation of the S1, S2, & S3 connections. Though there are technical reasons for isolation, an instrument will generally operate just fine if one of the connections has a direct ground connection, and it's cheaper to do so which is often an important factor in home sim building. But transformers also provide a degree of protection for the instrument. Transformers do not provide a direct current path, so if the DTS suffers a catastrophic failure, you're far less likely to loose a perhaps irreplaceable vintage A/C instrument. The issue has been finding suitable transformers at affordable cost. What I'm working with here are PCB mounted transformers with two identical output windings. They are intended to either be wired in series for higher output voltage or in parallel for higher current. I'm using them separately as input and output windings of a 1:1 isolation transformer. They work great and only cost $4~5 a piece.
The next steps start with updated PCBs.

Digital to Synchro Converter (5 November 2021)
The first prototype has been asssembled. The next step is developing test code.

Digital to Synchro Converter (24 October 2021)
The topic of synchros pops up now and then as people investigate the possibility of using real aircraft instruments in simulators. Some instruments utilize simple control voltages and are relatively easy to press into sim service. Some instruments contain mechanical gyros and are next to useless in stationary service unless you can alter the laws of physics. Somewhere in the middle are remote reporting instruments that incorporate synchros. These instruments can often be used in a simulator. However, doing so can be a bit a of a challenge.
Synchros are electromechanical devices that are frequently mistaken for small three phase motors. They have three wires referred to as stator phases and two wires that connect to the rotor. Worse yet, in many applications an instrument pointer is stuck on the end of the rotor shaft which turns to move the pointer. Sure sounds like a motor, doesn't it? The fact is, a synchro is a rotary transformer, not a motor. It is a device for encoding a mechanical angular position into a three wire electrical signal referenced to a two wire power signal. Used in reverse, a synchro can decode this electrical signal to follow the angular position of the transmitting synchro.
Without an understanding of what a synchro is, using synchro based instruments can be rather frustrating. Once you understand, it's pretty straightforward. You don't even need a transmitting synchro. You just need the three wire, synchro signal, and there are digital to synchro converters that provide just that. Unfortunately, they are outrageously expensive. It's the alluring neatness of using real A/C instruments coupled with the expense of commercial synchro converters that leads us to yet another DIY digital to synchro converter.
This revisits a project I did about ten years ago and published in BRFS. The core functionality remains the same. A sample of the 400Hz power supplied to the aircraft instrument is passed through two parallel channels that scale the samples by factors ranging between -1 and +1. The scaled signals are amplified suitably then can be connected to the instrument. Connected directly, the ground connection acts as the third synchro phase. If the specific instrument does not permit such a ground connection, a pair of transformers can be used to isolate the ground.
There are a few differences (improvements, I hope) from the original design. The Microchip microcontroller programmed in assembly has been replaced by an Arduino Nano and C/C++. The interface is now USB and/or CAN Bus. The original 13 bit resolution has been dropped to 12 bits to avoid a potential problem and reduce complexity. The output amplifiers have been redesigned to avoid using now obsolete components.
I was going to build a prototype on proto board, but JLCPCB is just too, too cheap. Besides, I ultimately want a PCB version of this, and I figured I may as well start the board development process now (3D preview below). The board is being made as I type this.

Radio Head Project (27 August 2021)
Radios, both nav and comm, are an integral part of the flight sim experience. Using a mouse to adjust them doesn't help immersion. You can fix that. Just buy a radio stack for your sim. Alternatively, you could build it. If you're the type who likes building, the fact that you can save some money probably isn't your main decision factor, but just for the record, you can save serious money by taking the DIY approach. In either case, adding radios nudges immersion up another notch.
What got me started was the availability of cheap 6-digit LED modules with serial interfaces. They were almost perfect for displaying the frequency. Their major shortcoming was being not quite as small as I'd like. A common size of the face of general aviation radios is 1.75" high by 6.03" wide. If I used two of these LED modules, one for active and one for standby, I'd have a 2" high radio face. Since I'm not trying to make an exact Narco or King replica, I decided I wouldn't worry about it. Two inches would be just fine.

As it turns out, there is an0ther advantage of 2": cheap 5cm by 7 cm prototyping boards. This is a convenient size for holding an Arduino Nano, a voltage regulator, and a few rotary encoders. The 5cm width is a good match to the 2" radio height. I could certainly have cut a larger piece down to size, but it's nice when you can use off the shelf bits and pieces without the need to trim them.
And speaking of off the shelf bits, there's more than enough room for an MCP-2515 CAN bus module. My aim is to include CAN bus connectivity on all new projects. CAN bus was developed for just these sorts of applications. While the Arduino USB can support connectivity, either as a Windows virtual serial port, or as a custom I/O device care of Sim Innovations Air Manager, I expect CAN bus to be easier overall as the simulator grows.
At this point the electronics exists only as a fuzzy block diagram in my head. The project's mechanical aspects, however, are well along. All that's missing are the frequency swap button and the knob for the volume control.

Attitude Indicator Project Update (13 August 2021)
The electronics has been pulled together. It will probably work, but I can't say for sure until I generate some test code. There shouldn't be any huge surprises, because this is pretty straightforward stuff. (There will undoubtedly be some smaller surprises though.)
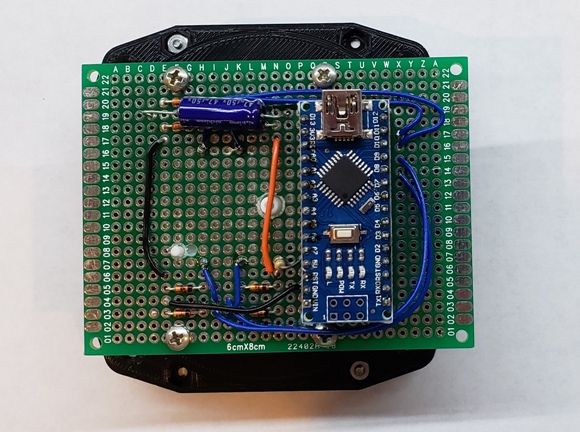
The availability of off the shelf modules allows simple block diagram design to handle potentially complex performance. The heart of it all is the ubiquitous Arduino Nano. There's a pair of micro-stepping motor drivers, one for pitch and one for roll. The module underneath the perf board is for an optional CAN bus connection. There are a few discrete components, and that's it.

Attitude Indicator Project Update (27 July 2021)
The design seems to be converging nicely. I've printed and assembled the mechanical portions, and the electronics is designed and awaiting solder. That shouldn't take too long as there isn't much soldering required. I'll make use of pre-made modules like stepper motor drivers, a CAN bus transceiver, and an Arduino so wiring is mostly power and module interconnects.
Actually, wiring might be an issue. More specifically, the wiring for the pitch motor and sensor. Since the whole pitch assembly rotates to indicate aircraft roll, the pitch wiring must tolerate a bit of flexing. In theory this will be handled by loosely wrapping the wires around the roll motor shaft. Small gauge stranded wire should be fine. If not, I've got some super flexible, silicone insulated wire that should.
This build has also uncovered a few more small issues, which is why we build prototypes.
The pitch mechanism is slightly too far from the wings and could be moved forward. This will require a small change in the pitch horizon to create a bit more clearance from the faceplate mounting screws.
The cage that surrounds the pitch mechanism is made of four pieces which are printed separately. This avoids huge amounts of support material and provides an opportunity to correct for less than perfect tramming of the 3D printer. It's not super difficult to glue the pieces together, but I think adding a few alignment tabs might be a good idea.
Some of the mounting hardware is difficult to hold in place during assembly. I'd normally include a hexagonal recess to hold the nut, but that's probably not workable in this case. Another potential solution is using epoxy to hold the nuts in place before final assembly.

Attitude Indicator Version 3 (12 July 2021)
I'm now on the third major revision of the project. The roll motor has been moved making the pitch mechanism shorter and much lighter. The pitch mechanism has been stiffened a bit to reduce lateral motion. The case has also been stiffened by adding top and bottom supports. Finally, there is a more nearly complete 3D model. It's missing some circuit model supports that I won't be able to add until the electronic module arrangement is finalized.

Attitude Indicator Prototype Evolution (20 June 2021)
The hybrid stepper motors used in this project might seem a bit overpowered. They are. They also have a robust frame, and their bearings will support significant side loading. This allows for a simpler design. An earlier version had a shaft and support bearing for the roll motion of the horizon. This version eliminates the shaft and bearing along with a shaft to motor coupling by supporting the horizon mechanism directly on the roll motor shaft. The allows the electronics to be mounted on the instrument back. The design is a bit less complex, the instrument is smaller and lighter, and the stress on the PLA body is reduced making warping or drooping less likely.

Overall, it's better, but I think there's further room for improvement. In this version the roll motor is part of the horizon mechanism so the motor is supporting its own weight along with the rest of the horizon mechanism. That's not likely an issue for the motor itself, but it does increase the bending force where the motor shaft fastens to the back of the instrument body. This may not actually be a problem, but mounting the motor on the rear of the instrument body would reduce the bending force which seems the more conservative approach.
Naturally there are tradeoffs. Moving the motor will increase the leverage its weight exerts against the top mounting screws and instrument case structure. Mounting the electronics becomes a bit more demanding. On the positive side, moving the motor will result in four fewer wires to worry about flexing when the horizon mechanism rotates.
Attitude Indicator Body Prototype (10 June 2021)
Each time I start a project I tell myself "This time I'll finish the design before I start building".
Didn't finish this time either. Somehow, it's just more fun if I have stuff cluttering my desk. Adding to the clutter is an early prototype of the structure that's intended to hold the attitude indicator pitch mechanism and the electronics.

In theory the 3D model in Fusion 360 should be enough, but handling the physical prototype seems to generate more ideas for improvement. Maybe it's feeling where the weight balances that leads to thinking about stress in the plastic which leads to considering other approaches. In any case, there's a good chance I'll be taking this design in another direction.
New Project: G/A Attitude Indicator (25 May 2021)
I've begun a new project, a steam gauge, general aviation attitude indicator. If all goes well there'll be an eBook about about. So far I've got a lot of ideas and a working prototype of the pitch mechanism.
There's a 35mm pancake stepping motor on the far side of the central plate that drives an arm that moves the 1/4" tube poking out of the slot in the horizon support. The motor is driven by a microstepping driver module. With a 400 step per rev motor and a 1 to 16 microstep, movement of the horizon flag is quite smooth. I'm pretty happy with that. There's some play in the mechanics which occasionally makes noise. With that, I'm a bit less happy.
I'm reasonably certain I can get the whole thing working and talking with X-Plane (thought Air Manager). Something I need to investigate is the long term stability of the mechanical structure given that PLA isn't the strongest of plastics. There's the load on the roll bearing which will support the pitch mechanism, and there's the cantilevered load of the whole instrument hanging off the mounting screws in the instrument panel.
Building A Heading Indicator DONE! (14 May 2021)
It's finally done and available as an eBook from Amazon. Clicking on the cover image will take you to the Amazon product page.

This is a detailed guide to making a directional gyro style heading indicator using an Arduino Nano, a stepper motor, and a 3D printer. I chose a NEMA 14 motor because compass disks present a higher dynamic load than a simple pointer, and I didn't think a little Switec motor with its tiny plastic gears could be expected to last. NEMA 14 motors are readily available and easy to drive using the same inexpensive micro-stepping driver found in desktop 3D printers.
Soldering has been minimized by making use of modules. There's the Arduino, of course, and a TMC2208 motor driver. Optionally, there is small CAN bus module. These things plug into a carrier/interconnection board made using a 6 cm by 8 cm protoboard. There are wires to the motor and such, but no SMD parts.
To simplify interfacing, the guide includes an Arduino sketch that uses a Sim Innovations Air Manager library. It lets the heading indicator communicate directly with Air Manager. All you have to do is write a few lines of Lua script. Air Manager has modules that do the heavy lifting interfacing with FSX, FS2020, X-Plane, and P3D. You don't have to use Air Manager, which is payware. There's a separate, non-air manager sketch. If you're happy writing the code, you can make use of a serial com port utilizing the Arduino's USB connection.
I threw in an optional CAN bus module, because home cockpits seem to turn into a mass of wires, cables and hubs. CAN bus was developed to control wiring complexity in vehicles and is in every car made today. It might seem a bit esoteric, but it's cheap, it works, and it's been around for years, decades actually. It hasn't received the exposure in the flight sim community it deserves even though it was designed precisely for this sort of application.
Building A Heading Indicator - Status Update (7 April 2021)
This eBook was supposed to be a 2 month, 50 page project. It's become a 5 month project pushing 100 pages. Why? Well, reasons.
Interfacing a simulated instrument is a big deal. And it gets bigger with each instrument you add. Literally. Each adds more wiring for data and for power. There are the inevitable hubs, whatever additional power wiring is needed, and perhaps issues enumerating connections. The automotive industry faced, and solved, a very similar problem a few decades ago with the CAN bus. Controller Area Network technology made inter-connection of a growing assortment of electronics in vehicles far more manageable, as well as less expensive.
CAN shows similar benefits in growing home flight sims. CAN bus modules are cheap and readily available. The book took a jump in size and time invested when I decided to include the option for CAN bus in the project.
Another point about interfacing is that an instrument isn't all that useful if it's not logically connected to the simulation software you're running. There are several flight sim programs you can choose among, and each has its interfacing challenges. Since this series of eBooks was intended to be focused on a specific project, interfacing seemed too broad a topic to cover and therefore outside the scope of the book.
Then I spent a little more time looking at Sim Innovations Air Manager, and interfacing became a smaller, more manageable topic and was suddenly within scope. (At least, if you choose to use Air Manager.) So, the manuscript grew some more.
Then there's the material I took out. I had intended to have internal lighting on the project. What I had was mediocre. I have a lot of ideas for improving it, but being 5 months into a 2 month project, I decided to take it out. Of course, that took time, though hopefully less than would have been required to improve the lighting feature.
At that point I thought the manuscript was done. A subsequent read through turned up a hole where some test code should be and some assembly instructions that seem a bit anemic.
That's where things stand now: "Done" except for a bit of polishing.

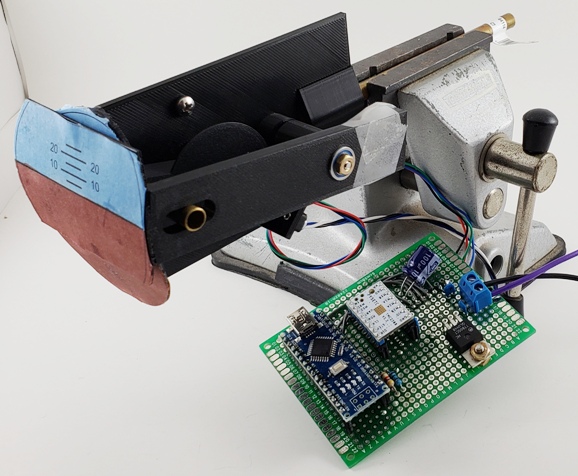
A $10 Vertical Card Compass (10 March 2021)
It might seem that I am haring off onto another path largely on evidence that I have hopped down another rabbit hole. Admittedly, that is the case. Fortunately, it's not a terribly deep rabbit hole.
It all started innocently enough. I was working on the revisions on BSPI (see below) which makes use of a Switec stepper motor, and I wondered how much weight you could hang on its shaft. This is a bit more involved than it might appear because it's not just the total mass that has to be considered. You have to think about rotational inertia as well. The actual dead weight mass is probably not an issue for reasonable applications, pointers and so on. Switecs are used for automotive speedometers which can have pretty big pointers. These seem to be supported well enough by the Switec's steel shaft and the plastic bushings that are part of the Switec body.
The real issue comes up when you want to start swinging that mass around. Now you've got to look at the inertial load on the motor. Rotate the pointer, and it resists. That's inertia. This pushback isn't seen by the plastic case bushings so much. But it's certainly seen by the teeth on the plastic gears, and they are really, really small.
Bottom line, put too much mass on a Switec, and the gear teeth have a short miserable life.
Still, while speedometer pointers are demonstrably not too heavy (they're in cars, right?), the long shape presents a significant inertial load. So, would it be workable to have more mass but shaped to present a smaller inertial load? Maybe a disk rather than a long pointer?
I'm uncomfortable with a large disk that you'd find in a directional gyro, but maybe something smaller like a vertical card compass would be okay.
Maybe what I should do, I thought, is try it. Just 3D print a 2 inch disk and stick it on a Switec. Four wires to an Arduino Nano, a bit of code adapted from another project, and it could just sit there spinning until it didn't. Then I'd know.
Of course, I couldn't stop there. Too easy.
I printed a support for the Switec and the Nano. The support became a box. I opened up the Switec, just to look around, and since I was there, I removed the output shaft end stop. That lead to adding an opto interrupter to the supporting box. The disk acquired a little tab that lines up with the interrupter, as well as some compass artwork.
I wanted to keep it cheap, but that didn't happen. Not if you add the time I invested. Dollar wise though, the cost is pretty low. I'd bought a bag of Switecs at $2.50 each. Same thing with some import Nanos: $2.70 each. The opto interrupter cost me $2.03. Throwing in screws, nuts, a couple resistors, PLA at $.025 per gram, and a chunk of clear acrylic for the lens brought the money outlay to $9.66 plus or minus. Call it $10.

Book Update (1 March 2021)
I've revised Building Single Pointer Instruments to correct a few issues and to add new material. The revised ebook is live on Amazon and is available at no cost to people who bought the original release by logging on to their Amazon account and visiting the "Manage your content and devices" page. Find the title in the list and you should find a link for the revised ebook.
If you haven't already bought a copy, may I recommend that now's a great time? Not only do you get a well illustrated guide to making single pointer instruments using a 3D printer, you get expanded content which now demonstrates how to connect those instruments to Air Manager. Once you're connected to Air Manager pulling data from X-Plane, FSX, FS2020, FS2, and P3D is just a few lines of Lua script away.

eBook 2 Progress & Air Manager (22 February 2021)
I spent some time learning about Air Manager, and I've decided to add a bit more to the book. When you think of Air Manager you mostly think of virtual instrument panels. But Air Manager also supports interfacing physical things like LEDs and switches by using Arduinos as intermediary I/O blocks. When you use this capability you mostly use pre-programmed functions, but there's a generic messaging system to take care of things that the pre-programmed functions miss. It's called Message Port and it lets you do magic: It lets you easily interface DIY instruments to FSX, FS2020, X-Plane, FS2, and P3D. And that's something I want to put in the book.
And that's what I'm doing. In fact, I'm also adding to the earlier book on single pointer instruments and will be uploading a revision. So, as far as progress status goes, I'm back to more testing and more editing.
eBook 2 Progress (11 February 2021)
It's down to the editing and clean up (mostly) . And I'm still doing a little testing. Everything seems to work, but I keep coming up with "improvements" and changing things. So, more testing. For example:

The Uno on the right is talking through the CAN bus module in the middle with the DG on the left. More specifically, the Uno implements a loop back mode to test, well, a lot. Turn the knob on the DG and the debounce code does its thing and passes the results to the communication code. The comm code builds a data packet and fires it off to the DG's CAN bus module (which you can't see). That modules does the CAN bus thing and sends the packet to the CAN bus module you can see. The Uno pulls the received packet from the module and decodes it which is pretty easy since there are only two messages: the knob clicked left, and the knob clicked right. Based on which one it got, the Uno replies with either rotate left a bit or rotate right a bit, and we get a test of moving data the other direction plus, once the data has been received, the motion control code get exercised.
I really like the CAN bus. I think it's a natural for DIY flight sim. It reduces wiring complexity and it's cheap. It's easy to set up. You don't have to assign addresses to devices on the CAN bus. Each data packet has an ID that typically identifies the data type or contents. Data is provided by whatever has it and used by anything that needs it.
For example altitude probably comes from a gateway device like an Arduino connected through USB to the simulation computer. When it gets new data to throws it onto the CAN bus with the altitude ID. The altimeter on the MIP is listening for the ID. When it sees it, it grabs the packet and moves the instrument needle. If you put a second altimeter in place, you just plug it onto the bus and it reads the same packet. Easy.
It works for things like switches too. You might for example take an Arduino Nano and use its inputs to monitor a cluster of switches on the panel. If something changes it puts a packet on the bus. You don't have to wait to be polled to provide switch data. You send it when it happens. You could even code it so it sends switch data every few seconds even if there are no changes. This could take care of the start up synchronization issue and provide some behind the scenes diagnostics. If something isn't heard from every several seconds you know something's wrong.
Lots of reasons to like CAN bus.
eBook 2 Progress (27 January 2021)
I'm in the last 10% that takes 90% of the time. At least, that's what it feels like. I keep finding things I want to change, and this leads to more 3D printing to check the results. I've accumulated a fair pile of bits and pieces along with a small pile of prototypes.
I've spent the last few days making flowchart drawings and explaining the Arduino sketch. That should be done in a day or so. Then there's the artwork for the lens, some how-to-put-it-together images, and some CAN bus testing.

I still expect to have a decent draft by the end of the month, though I'll likely make more changes after that.
Upcoming eBook Progress (12 January 2021)
The manuscript is about 75% there. The 3D printing instructions are very nearly complete. The circuitry construction was there... until I decided on a substantial layout revision. Now all the illustrations are in the to-be-redone pile. I'm getting a lot of Inkscape practice.

Firmware still needs some attention, and I'm working out the best way to present the final mechanical assembly. All in all, though, it's starting to look like a book. End of the month should see a solid first draft.
DG/HI Project for Upcoming eBook (29 December 2020)
The directional gyroscope / heading indicator project is firming up nicely. There are eight 3D printed items, nine if you want to print the knob rather than buying it. 3D printing is easy, assembly uses standard screws and nuts plus a tiny blob of epoxy. A NEMA 14 stepping motor supports and rotates the compass disk. The electronics fits on a 6 cm by 8 cm protoboard which acts as a carrier for an Arduino Nano, a TMC2208 motor driver, and a CAN bus module.

The unit will be controllable through the Arduino USB connection or across a CAN bus though I have to admit that I haven't written that part of the code yet. (What could possibly go wrong???)
Completing the code is just one of the remaining steps. I'm also working on the instrument lighting. The white light diffuser surrouding the compass disk can be lit by a ring of eight LEDs just behind it. I'm experimenting with ways to make the illumination more even. And then there's the part where I actually write the directions on how to make this thing.
Thank You, and More's Coming (12 December 2020)
Thank you to those of you who bought Building Single Pointer Instruments. I do appreciate it.
BSPI is the first in a series of flight sim related guides. The second, a guide for a DG/HI project, is coming along nicely. I have a partial manuscript and a moderate amount of hardware. I pulled together prototype 3D printed components in November of 2019 then set it aside to finish BSPI and address other pursuits. It's back on the top of the priority list and the prototype electronics is the most recent chunk of hardware to materialize.

The electronics consists of an Arduino Nano, a TMC2208 motor driver, a 7805 voltage regulator, an MCP2515 CAN bus module and a few caps and resistors. It all fits on a generic 6 cm by 8 cm prototyping board. Assembly was straightforward. All the tricky surface mounted stuff's been taken care of by the people who put the modules together.
This is the first time I've tried using a motor driver module in a sim instrument. I'm expecting great things, like really smooth rotation and quiet operation. In any case, it seems like a really easy way to drive a NEMA 14 stepper motor.
A motor this size might seem like an over kill, and I suppose it is to an extent, but look what you get. The motor frame is robust, and the shaft has a significant diameter. It's going to provide a very stable support for the compass disk, and the shaft is large enough that there's no worries about the disk slipping on the shaft.
The CAN bus module's another first for me. Yes, the Arduino has USB which talks just fine with the sim computer, and that's probably the way to go for a small simpit. Once you start adding up all those instruments and switches and things in a moderately sized simpit, you can have a real rat's nest of USB cables and hubs. CAN bus was developed to avoid just this kind of thing in the automotive industry. Since CAN bus modules are so cheap, we can do the same with simpits.
A New Guide for DIY Sim Instruments (4 December 2020)
Building Single Pointer Instruments for Flight Simulation is now live on Amazon as a eBook.
This is an introduction to building basic, single pointer style instruments and gauges like airspeed indicators, fuel gauges, and tachometers. It's the same topic I covered almost two decades ago in Building Simulated Aircraft Instruments, but it's been brought up to date with 3D printing, Arduinos, and Switec meter movements. It also capitalizes on free software like Fusion 360, Inkscape, and the Arduino IDE.
Just to be clear, this is not by itself a replacement for the book BSAI. It is a far shorter guide that focuses on just one type of instrument, the single pointer style. I do have tentative plans for producing additional guides, each focusing on specific instruments or types of instruments. (Heading indicators, dual pointer gauges, artificial horizons, etc.) Taken together, these hypothetical guides might be considered a BSAI replacement. We'll see.
Click on the cover image below to be taken to the Amazon product page.
Coloring Instrument Artwork (5 November 2020)
The markings on an instrument faceplate sometimes have color, and when it does, it's often important, like red lines or safe operating regions. So it makes sense that if you're making a simulated instrument, it would be important to have color in the faceplate markings. This can be problematic when you don't have access to a color printer. That's the background that lead up to me trying to add color to a black and white print.
My first attempts made use of cheap water based markers. Results were dismal at best. Ignoring the fact that the colors available in the basic assortments don't include an acceptable green, I found it impossible to get anything even close to a uniform color density.
The best result came from an inexpensive set of alcohol based "art" markers. These allow you to blend colors on the paper, or as it turns out, blend a color with itself. It's not perfect (not for me, anyway), but it's far better than what I started with.

There's still room for improvement, but it's at least serviceable. I may yet buy a color printer, but until then, I'll use alcohol based makers to add color to the arcs then use a white paint pen to add the radial markings over the color.
Dual Engine Gauge Prototype (13 August 2020)
Somehow a month+ has gone by, in part eaten by random house projects too boring to mention. On the techie side of things I have a partially constructed prototype of a dual engine gauge based on a pair of the ubiquitous 28BYJ-48 stepping motors. A nominal 64:1 gear ratio gives these little motors enough output torque to operate valves and air handling louvers, as well as, a very small step size. Unfortunately this is done at the expense of rotational speed. So, while you would get very smooth needle motion if you used this motor in a gauge, the needle dynamics would be terrible for applications like rate of climb or even airspeed.
Still, there ARE applications that fit this motor quite well. Fuel quantities, exhaust gas temperatures, oil pressure, etc. tend to change more slowly.
This is a dual pointer gauge project which uses two 28BYJ-48 stepping motors, a 3D printed structure, an Arduino, a ULN2803 motor driver chip, and eventually a CAN bus module.

The 3D printed motor shaft extensions have a pie wedge shaped flag which passed into the gap of a optical interrupter which tells the Arduino when the pointer has rotated too far in either direction. Currently the Arduino sketch is just a rudimentary test making the needle swing left and right. Still, it does work.
I'm not sure I'll stick with the Nano. The project doesn't need much of what's on the board, particularly so if I use the CAN bus. I know it's small and cheap, but space it tight. If I use a bare Atmel 328PU, I might be able to put everything on a single proto board and reduce the amount of wiring.
Flight Sim Gauges & CAN bus modules (8 July 2020)
I'm back working on 3D printed flight sim gauges along with a DIY guide to making the single pointer variety. I've got several working prototypes and if I had a color printer they would look like this:

Since I don't have said color printer (and because I'm not using blue filament), they tend to look like this:

There's a 2.4" by 2.4" proto board on the back supporting a Switec meter movement and an Arduino Nano. So, for only several dollars, you get a USB-interfaced basic gauge that could be an airspeed indicator, rate of climb indicator, tachometer, etc.
I'm not totally convinced that I want a separate USB connection for each instrument. I suppose with powered hubs I could connect quiet a lot, but Windows and enumeration of a heap of USB devices on the sim when powering up the host computer makes me a bit nervous. That brings me to CAN bus.
CAN bus is the bit serial communications network used in cars. It's been around for about twenty years, works well, and thanks to the wonders of volume manufacturing, it's cheap. For a bit more than two dollars you can buy a CAN bus module that plays nicely with Arduino.

I haven't worked with these yet. I just got a pair yesterday, but they look very promising, especially when you consider how tangled simpit wiring gets as the project grows. CAN bus lets lots of devices share the same bus, and the bulk of the messaging protocol is handled by the module. So, it looks like you could have only one or two USB devices (which might be Arduinos or Teensies) acting as gateways onto the simpit's CAN bus.
Junk Receiver LO & BFO (24 May 2020)
I cheated on the local oscillator and beat frequency oscillator. I ccould have made them from discrete components, but not only was it easier to base them on a clock chip, it's also far more convenient to operate the radio using a clock chip. It's controlled by an Arduino which can also be used to operate an LCD display. You can see exactly what frequency the radio's tuned to. Very cool. Besides, I'm just totally impressed by the Si5351 clock generator chip.
The Si5351 series was designed as a clock generator for digital circuitry, but the very same qualities that make it good for that also mean it's good for many radio applications. It's main downside from my perspective is that it's an SMD part that, realisitically, requires a circuit board. Fortunately, it's available from multiple sources, such as Adafruit, on a tiny board that includes the reference crystal oscillator and voltage regulator. And it's cheap: $8 for the assembled board.
Here's the LO-BFO module.

Many thanks to Charlie Morris, ZL2CTM. This is based largely on his work which he very generously published on his site, http://zl2ctm.blogspot.com/
A Junk 40 Meter Receiver (10 May 2020)
I changed tracks and decided to work on a basic receiver before completing the SSB transmitter. I'm attempting to make it out of materials I have on hand, so it's something of a "junk receiver". I got it working last night even though it's not actually complete. I've yet to build the local oscillator or the beat frequency oscillator. I'm using a dual channel DDS function generator instead.

It hasn't been designed so much as thrown together off the cuff. I knew I had a 10.7MHz crystal filter with a relatively narrow (30KHz) bandwidth and decided I'd use it for the IF. Since I'm targeting the 40 meter band (7MHz) the radio would have to up convert to the IF so I could use a low pass filter on the input rather than a bandpass. This let me try out something called an "ultra spherical" filter which is potentially very low loss. This sounded good from the perspective of later using it on the transmitter output as well. That's the filter at the top left hand corner of the circuit board. That feeds a 2N3904 gain stage which in turn feeds a double balanced mixer.
Now, I have several very nice commercial mixers that would do a bang up job in this application, but I also have a bag of HP hot carrier signal diodes purchased at a swap meet somewhere in the forgotten past. This radio seemed like a great project to test my toroid winding skills and therein roll my own mixer. Four diodes, two ferrite toroids, and a couple feet of enameled wire later I had a double balanced mixer ten times the size of the commercial mixer which likely performs one tenth as well, but Hey! it's fun.
The mixer feeds a second 2N3904 gain stage which pumps things up a bit before handing the signal off to the crystal filter, the silver box in the middle of the board. The filter output drives an MC1350P, which I was surprised to see is still available. I thought these things were beyond obsolete, but apparently not. It's a nice little variable gain IF amp that comes in a plastic 8 pin DIP. I bought 10 a very long time ago, and it was time for one of them to put in a little work on my behalf which it seems to be doing just fine.
Now we head into the demodulator, which is actually a second double balanced mixer identical to the first. The output of this mixer goes into a TDA1015 which I'm pretty certain IS obsolete. It's an audio amplifier containing both a ~1 watt power amp and a preamp. It's not a great part, but I have a number of them from back in the swap meet days, so why not?
Something I'm missing that's soon to be a problem is a good antenna. For the near term I'm making do with an extremely casual mag loop knocked together from 12 feet of #14 house wire and a 365pF tuning cap. I'm using a ferrite toroid to couple into it and get a VSWR of about 1:1.2. The whole mess is supported by a stack of (empty) cardboard boxes. Dollars expended: zero.
I'm getting a so-so level of performance. There's no reason to expect more. The IF is too wide. There's no audio filtering. I'm picking up noise from both sidebands due to the simple demodulation approach. The antenna has a low aperture, and it's located in the basement. Nonetheless, it's fun.
SSB Phase Shifting (24 April 2020)
As mentioned before, Pete, N6QW, got me interested in tinkering with phasing SSB radios. Single sideband radio may seem a bit complex, but conceptually, it's really simple. You just take the audio spectrum of speech and shift it up into the RF realm. AM, on the other hand may seem simple, but take a look at its RF realm and you see not only the speech audio spectrum shifted up, but also an inverted copy of the audio spectrum along with a huge amount of mostly useless RF carrier energy. Sadly, the complexity of AM requires only simple hardware to make, while the simplicity of SSB requires, well, a tangle of circuitry (or software).
Of course, it it were simple, Pete wouldn't have suggested it as a CoVID-19, stay at home project.
There are multiple ways to generate SSB. Pete has focused us on the phasing method, an older approach from the days of vacuum tubes when crystal filters were big ticket items. Phasing was the less expensive approach that traded finesse for dollars.
Phasing requires the use of 90 degree phase shifted audio and RF, carefully combined so that the unwanted complexity in the RF realm almostly magically cancel themselves out, leaving the simple purity of the audio spectrum shifted into the RF realm.
Creating the 90 degree phase shifted versions is what I've been up to recently. It's relatively easy to phase shift a single frequency. It's a bit more of a challenge to handle a broadband signal like audio. Back when vacuum tubes ruled, you bought a plug in module containing a handful of carefully selected resistors and capacitors. It hit the sweet spot for performance versus cost. It gave satisfactory, though not great, performance, but you couldn't do better without adding additional expensive gain stages. Today op amps cost pennies a piece, and we can make broadband audio phase shifters with astounding performance.

All it takes is a little time checking component values, and you can build a phase shift network that would knock the socks off radio amateur from the 1960s.
You also need a phase shifted version of the RF carrier. There are multiple ways to do so, but given the analog nature of the audio phase shifting circuitry, I thought I'd take an analog apporach here as well. I built a hybred coupler. It takes all of three components, an RF transformer of the appropriate impedance and two capacitors.

My first version worked, as did my second. So did my third. I just didn't realize they did. I kept seeing 75 and 80 degree phase shifts, and spent a rather large amount of time trying to figure out why such a simple circuit was not functioning properly. I was looking for the fault in the wrong place. I hadn't adjusted the time delay between the two scope traces.
Something Unexpected & A New Rabbit Hole (2 April 2020)
Awhile back I ordered a microphone capsule from a Chinese vendor. This was before the world COVID-19 situation had grown into what it is now. After a few weeks I wrote it off. To my surprise, it showed up.

I'm not quite ready to do anything with it, but it should be fun when I am.
Like many, I'm a bit stir crazed from the stay at home situation. As I was wandering about (mentally) looking for shiny topics to take my mind off RL, I fell down a new rabbit hole. Pete, N6QW, suggested on his blog that radio-minded individuals should build a phasing SSB transmitter given that we're stuck at home. I had done a bit of research into this several years ago, and Pete got me thinking about it again. So far I have the audio phasing network working and am currently following this particular rabbit a bit deeper.
Microphone Book, LTspice (4 March 2020)
I uncovered the manuscript for the DIY Microphone book I started a few years back. And, it has grabbed a bit of my time. One of the questions of writing is just how deep to go. Too shallow and there's no value, because even weak Google-fu leaves your writing efforts far behind. Too deep and you leave most of your readers behind. The sweet spot is deep enough to add real value without scaring potential readers away. Unfortunately, as the writer I find that spot difficult to judge.
Case in point is discussing /not discussing LTspice. It's a very useful tool that does not immediately communicate the need for a bit of technical wisdom in interpreting its output. You run it and it gives you an "answer" which must be the right answer, right? Well, yeah, but maybe it's not precisely "your" answer. At best it's a cousin of your answer. The solver simulates an abstraction of a physical circuit. How good is that abstraction? And, how would you know? The answers to all these questions may be very, very distant cousins of the answers you want.
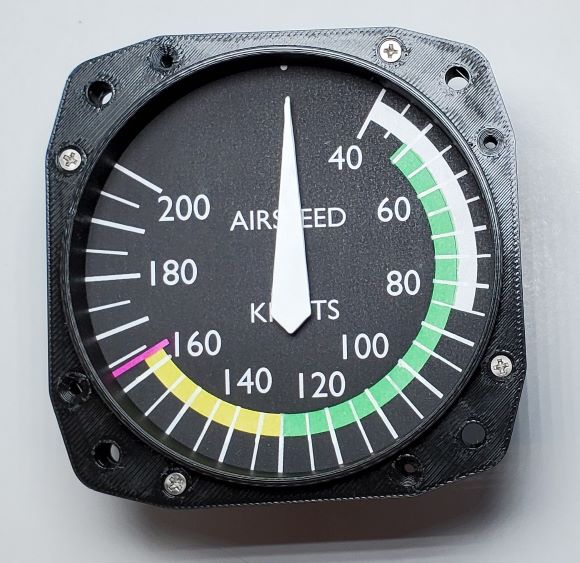
Airspeed Indicator Project (16 February 2020)
I managed to put a little time in on the flight sim airspeed indicator project. I wired the proto-board that supports the Arduino and the Switec meter movement, and the ASI is now moving its pointer.
I could have just connected the Switec directly to the Arduino, but I added extra protection since the Switec is an inductive load. The current demand is only about 20 milliamps, and as long as the protection diodes inside the Atmel chip can handle that, there should be no need for additional protection... except...
I don't really know what happens when the Switec shaft is turned manually, say maybe when adjusting the pointer or just playing around. After all, it's a permanent magnet motor, and it does generate an output when operated in reverse. Is that a problem (threat?) to the Arduino? I don't know. So, just to be safe, I added extra protection diodes.
For now I'm back to writing Arduino code. There's a library for stepper motors, unfortunately, it not really suitable for this project. The Switec is a bit odd internally and takes a somewhat weird step pattern. The Arduino stepper library will make the motor move, but not smoothly. And then there's the issue that the library call is a blocking call. That's not what you want if you expect the instrument to be continually listening for new commands.
It Really IS Different (8 February 2020)
I have the second edition of Art of Electronics. I resisted buying the third edition; how different could it be? Well, turns out, different enough. Once I spent some time leafing though the X-Chapters I realized I needed to spend the money on the newer edition.

I like the coverage of FETs. I really like the coverage of low noise design... This is not really an entry level book on electronics even though it does present a fair amount of basic information. This basic material serves simply as an introduction to in depth coverage of a topic.
More to Read (31 January 2020)
Real Life got interesting again with the result that I did less of the technical stuff I had in general planned to do. That's not all bad. In fact, some of it is very, very good. I now have a new grandson, and I am extremely pleased to spend significant time being a fawning grandfather. At the other extreme is dealing with income taxes. They are somewhat more complex this cycle as we sold a house, moved, and bought another. The taxes, per se, are not too terribly difficult; it's finding the pieces to plug into the holes. The process of moving one's household tends strongly to randomize everything regardless of how hard you might try to keep them organized. It's taken days of digging through boxes and sorting papers to make sense of the mess. It's just about done, but that's just about ALL that I've done.
A bright note (of the technical kind) came in the form of the arrival of this book.

The Art of Electronics, the X Chapters contains material that did not fit into the 3rd edition of The Art of Electronics. It's the advanced stuff, the cool stuff you want to know when you realize knowing the basics won't get you where you want to go.
Fuel Selector V4 (22 January 2020)
I'm still looking at options for a fuel selector valve. This fourth version is recessed and circular. So far I've only printed the label and a half size test of the body. Currently I'm most interested in how the label will look. I cut the text into the outer ring then changed the filament during the print. Results are workable though I'd prefer more contrast.

Fuel Selector V3.1 (15 January 2020)
There's been a number of minor tweaks. Overall the selector is functional, I've just continued to make minor improvements.

An obvious change (and hopefully, an improvement) is printing the handle with red filament and adding identifying text to the top surface. I had thought of painting inside the characters, but the font is too small for the brushes I have on hand. A less visible change to the handle is a reduction in the mechanical clearances with the other parts. The assembly is tighter now and turning the handle feels a bit more realistic. There's still room for improvement, but currently, it's not bad.
The remaining effort went toward improving the text on the placard. Last week's attempt was to do a filament change mid-print with the placard body in black and the text in white. That mostly worked though the "T" on "BOTH" was malformed due to an extraneous blob of black PLA. I was able to correct most of the problem with a bit of micro-trimming, but would prefer an approach not requiring rework.
The next attempt was to print only in black, enable ironing, and paint the resulting smooth surface white. That was done on the above print with the red handle. The surface was smoother, but not really smooth. Also there was an obvious variability in finish quality across the surface that I don't care for.
My last attempt (on the right, no handle) was to print with black filament and no ironing. I then wet sanded the surface with 320 grit sandpaper to get a uniform surface. Finally, I painted the text and border using a fine tip paint pen. This is the best looking yet.
Fuel Selector V3 (8 January 2020)
I've continued to refine the fuel selector switch, and I have a workable prototype (though it could still be enhanced). There are three 3D printed components which support and activate snap action limit switches. This version is 3 inches square.


I have red filament on order, and printing the handle in red is a planned improvement. I might also add the text "FUEL" to the top of the handle, perhaps as a cutout in a white layer over the red. I'd like a bit more resistance to turning the handle. I"m not currently sure how to get that without complication or creating excessive wear. Something to ponder as I get back to writing.
Happy New Year (1 January 2020)
I took a brief break from writing to throw together a somewhat clunky prototype of a fuel selector for sim use. The handle and the shaft it turns were 3D printed as one part. The lower end of the shaft (which is round) ends with a short rectangular extension. A cam with a matching rectangular hole fits over it and holds the cam/shaft combo in place. Turning the handle rotates the cam which operates the snap action switches, or will once I get them mounted.

This is just a proof of concept prototype. It appears to work though there are a few things I will change. I've been a little generous with operating clearances. I didn't want the shaft to bind, but I got carried away. I'll tighten those a bit.
I'll print the text layers with white filament so the characters and the placard edge stand out. I may also add an aircraft outline in a style similar to that used with Cessna fuel tank selectors.
I think the handle should be printed using red filament. Black on black simply does not provide enough contrast.
Finally, I might change the switches to units have a roller. I'm using these because they were in my junk box. Or, maybe I should change the mounting to accomodate switches that have a straight lever since that style seems more readily available.
Happy Holidays (26 December 2019)
I've mostly been involved with family and preparation of the holidays, though some progress has been made on the draft guide to instrument building.
Arduinos & Software (19 December 2019)
I've been digging through my box of Arduino bits and pieces determining which ones still work. So far they appear to be okay. For a while it seemed as though the Chinese "Nanos" were dead, but apparently they aren't really Nanos. If I tell the Arduino IDE that it's connected to a Pro Mini, everyone's happy. Tell the IDE there's a Nano at the other end of the cable, and it's just crickets chirping.

For the time being I'll treat them as working. Hopefully they'll continue to do so.
Anyway, on to software... The intent is to use the Nano clone as the motor controller behind the Switec. I initially planned on using the "stepper( )" function included with the Arduino IDE. Unfortunately, there are a couple of problems with that. Turns out the Switec is a somewhat unusual type of stepper motor. Its optimal step pattern is not the basic quadrature square wave pair most steppers default to. The Switec will work when driven by stepper( ), but lose a third of its potential resolution. Another issue is that stepper( ) is a blocking call. It won't return until the step or steps are completed. If there's a requirement to monitor a serial connection, and of course there will be in a sim, being stopped dead waiting for an instrument pointer to move risks missing commands or letting a buffer overflow.
ASI Prototype (11 December 2019)
I'm close to having a functional prototype airspeed indicator. I had initially thought that I would have a small batch of printed circuit boards made, but protoboard seems the way to go for now. The circuit is just too simple. There's an Arduino, a Switec, and a few protection diodes. If I were to make several of these instruments I'd probably opt for commerical boards, but for now, protoboard is the order of the day.

This is likely the least expensive instrument I've built. The Arduino Nano is a $2 Ebay purchase from a few years ago. The Switec meter movement is likewise a purchase through Ebay at a cost of $4 or $5? The protoboard was, hmm, a dollar? Fifty cents of PLA, maybe. I'm sure there will be other charges against the project. I'll have to pay a few dollars to print the faceplate artwork with color arcs, since I don't have a color printer. All in all, I think it's coming in around $10 or so.
Drawing, Writing and Lighting (4 December 2019)
Most of the week has gone to working on a draft guide to making basic single pointer instruments. It's an updating of material I covered years back in Building Simulated Aircraft Instrumentation. There's a heavy focus on 3D printing and on materials and components available today. The intent is to e-publish, and to do so in much smaller chunks. E-publishing lets me use color images, something I couldn't do in dead tree format. I'm hoping this will be more accessible on several levels to readers.
What that's meant is that while I'm "writing" I'm actually spending more time drawing. The color images are in large part illustrating various steps in creating the STL files for 3D printing. So I've been learning how to create meaningful images and how to get then to stay where I want them inside the written document. It's frustrating slow.
I'm also trying a few experiments with instrument lighting. I used clear filament to 3D print a light diffuser surrounding the instrument faceplate. I have LEDs shining into the diffuser. There's room for improvement. I think the LEDs are too close to the inside edge of the diffuser. Maybe they should be embedded within the diffuser, rather than just shining into it.

Making Artwork (27 November 2019)
Most of my time this week seems to have gone into finding the right software to make artwork for gauges and flight instruments. These are not particularly difficult things to draw, and there are surely any number of drawing packages that could be used, but I'm interested in free. Why? Well, I'm considering developing updated versions of my flight sim books. Since they're project oriented, the cost of those projects bears on the attractiveness of whatever I put out there. So, free is good.
In the (increasingly distant) past I relied on TurboCAD. When I first started using it, it was an almost unknown title I picked up at a swap meet for a few dollars. Not great, but good enough. It let me develop artwork for sim instruments. It let me illustrate my flight sim books. But TurboCAD has changed. It's far more capable, and it now costs real money. I'm not happy with the thought of projects for hobbyists which require expensive software that gets only tangential use in those projects.
My first attempt at free was using LibreCAD. Unfortunately, LibreCAD appears to take a very casual approach to text. All I could get from it were crappy single stroke characters. Nope, can't do crappy text on an gauge faceplate, so on to attempt number two.
QCAD handles text nicely. I like that. What I didn't like was the way some important (to me, anyway) features were stripped out of the paid version to make the free, non-commercial version. Drawing color-filled arbitrary shapes became unacceptably cumbersome. The colored arc on the ASI would have been too painful to do. Hello, attempt number three.
I took another look at Inkscape. I'd used Inkscape a bit some time ago, but didn't find it all that useful for the work then at hand. I prefer CAD programs because I like the tools that CAD programs have. Inkscape is aimed at other clients. It's not an engineering package, and it doesn't feel like a 2D CAD program. But, if you look, you can find the basic functionality there, and guess what, you can make nice looking instrument artwork without much trouble.

3D Printed HI/DG and a Few Knobs (20 November 2019)
Since last week's 3D printed airspeed indicator turned out so well, I decided to try something more complex, a heading indicator / directional gyro. Rather than a little, low torque Switec meter movement, I've based the HI/DG on a NEMA 14 stepper motor. That may appear to be overkill, but not really. The compass rose disk presents much more rotational inertia to the motor. That would put significant loading on the Switec gear train resulting in a shortened life. And then too, there's the issue of making a good connection between the disk and the small diameter shaft of the Switec.
The NEMA 14 stepper, on the other hand, has no problem spinning the disk, and I've got no problem making a strong connection to its 5 mm shaft.

The disk is sitting too far forward currently. I've got the wrong motor installed. The proper one should be here in a few days.
This will be Arduino based and will use a 3D printer stepper driver. I expect that a micro stepping driver connected to a 400 step/rev motor will result in very smooth and quiet motion. We shall see.
I've also been printing knobs. Mostly, it's just for grins. I don't have anything to put the knobs on. If nothing else, it's practice with Fusion 360.

3D Printed ASI Project (13 November 2019)
I built a flight sim airspeed indicator a number of years ago. Among other things it took aluminum, acrylic, threaded spacers, and several days of effort. Over the past few days I built an ASI using a 3D printer and only several hours of effort. A significant portion of that time was directed to learning how to use the printer and correcting my mistakes. I still have some corrections to make, but overall I'm pleased with the results.

There are four 3D printed components including the pointer.
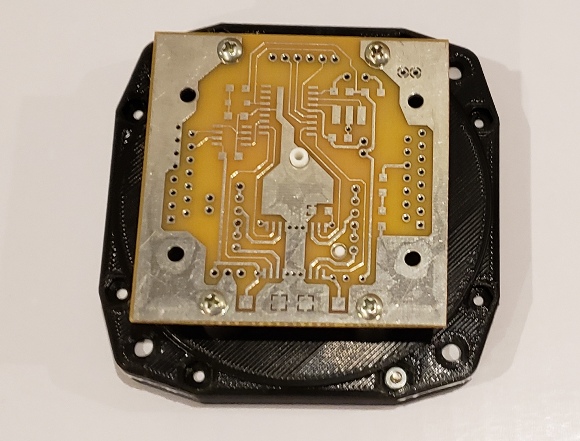
I've used a circuit board from an earlier project based on a Switec meter movement and a PIC16F648A. I'm planning to redo that. I'll keep the Switec, but I'll shift to an Arduino Nano. It's hard to beat a $2 electronic solution that includes the USB interface.
3D Printing Tests (5 November 2019)
I've been rethinking some of the flight sim instrument designs covered in Building Simulated Aircraft Instruments. The designs were developed to be built with tools that I reasonably expected flight sim hobbyists to have on hand in 2004. "Reasonably expected tools on hand" now includes tools like Fusion 360, Cura, 3D printers, and an Arduino IDE. The list of easily available materials has grown as well. With that in mind, I wondered how a DIY A/C instrument or gauge project might be approached.
One obvious step would be to 3D print as much as possible, and that brought me to try 3D printing the text on a gauge face plate. The thought was to print the faceplate with raised text and markings using white PLA. I would then spray paint the whole thing black. Once dry I would carefully sand the paint from the top of the letters and markings exposing the white PLA. Genius! Except not quite. Here's what I got.

The first test is on the left. It should have printed "12345" with "AIRSPEED" below that. Apparently CURA decided my Ender 3 couldn't handle the detail of 5mm Arial. The 3 and 4 are botched and the second line didn't see any G code worth mentioning. The second try, the middle, is the same STL with CURA scaling it up by 133%. It prints, but the character size is too large for the gauge faceplate. The test on the right is a new file with the characters converted to bold. Okay, that slices and prints, but looks not so good.
This would probably print quite well on an SLA printer, but that is something I do not have. So, plan B is Inkscape and printing on self adhesive paper.
With the faceplate plan A firmly put to bed, I moved on to test printing an instrument bezel. That at least worked reasonably well.

If I'd known it was going to work so well I'd have taken the time to load black filament into the printer.
New Toys (29 October 2019)
After a bit more than a year Mike's Flight Deck is mostly unpacked, and the workshop is finally coming back together. There's a new addition:

I've used a Tektronix 455 for just about forever. It still works, but the newer scopes keep getting better and cheaper, and smaller. Finally I couldn't resist the lure of the shiney and new (and small).
I also bought one of these:

I'm sure there are better 3D printers, but the Ender 3 Pro hits an attractive price-performance point. It's low enough in cost to appeal to a broad range of hobbyists while still being able to produce good quality prints. It's the sort of tool that a person interested in flight sims might add to his bench.
Of course that leads to the next step, learning how to do more with it than making copies of items snagged from Thingiverse. I've used TurboCAD for many years, but it's hard to compete with Fusion 360. My TurboCAD is woefully out of date, and they expect real money for a current version. Fusion 360 is offered for free to hobbyists. As wonderful as Fusion 360 appears to be, it's still a different system, and it's taking some serious effort to learn how to use it. Still, it's quiet where I'm at now, and I've got the time.
There are still a few cartons of Building Recreational Flight Simulators left, and I'm still selling them.
RL Update, v5.0 & Synchros Revisited (29 August 2019)
We have established a new household in Washington state about an hour from Seattle in an unincorporated area. This is the first time we've lived in the Pacific northwest, and its beauty is a significant reason that we have not succumbed to the chaos of our move.
While unpacking I ran across the digital to synchro interfaces I built some years ago. Because I also ran across a synchro related thread on the EEVBLOG forums, I started rethinking the DTS design. DTS version 2 corrected a design flaw, added features, but was mostly done to reduce cost. Most of that plays pretty well today, but cost is beginning to creep up. I'd used LM1875 low power audio amps as output buffers. At the time you could source them for about a dollar a piece. That's rare today.
Class D amps are somewhat attractive, but they often are set up with bridged outputs. If an output transformer were used this would be fine, but that's not always the case. There are many small synchros gauges that can be driven without transformer isolation, and that significantly reduces the interface cost.
What I'm considering now is an opamp with a couple of outboard buffer transistors. This seems like a step back in time, but for a hands on hobby project, trading assembly time for cost may be the right way to go.
RL Update, v4.0 (16 June 2019)
We have one foot in the new house and the other in an apartment. Chaos reigns. All the change of address action we did a few months back must now be redone. In the confusion I neglected to renew the domain for Mike's Flight Deck so the site went dark for a few days. The next major step involves getting the refrigerator into the new house and ourselves out of this apartment.
BRFS still shipping!
RL Update, v3.0 (13 April 2019)
Slow progress. The old house has been sold. The new house is almost ready.
And I'm still shipping copies of BRFS.
RL Update, v2.0 (27 February 2019)
The Big Move is 99.3% done, at least from a mileage perspective. Most of the household including Mike's Flight Deck Books is in storage a few miles from the yet to be finished new house. There are a few steps remaining like insulation, drywall, and oh yes, paying for it. And that requires selling the old house which also has a few steps outstanding.
Still, it's all moving forward, and I'm still shipping copies of BRFS.
RL Update (22 January 2019)
I wouldn't call it panic, not exactly, but as the date of the Big Move approaches with implacable regularity and we survey the incomplete nature of our preparation, we do experience what might be construed to be an overly elevated state of angst.
I had heard of a condition wherein one's feeling of ownership of things flips around, and you realize that it is the things that own you. I now totally understand. A lifetime of accumulated stuff now directs how I spend my time. Clean it, sort it, pack it, or get rid of it. It takes a really long time, and it's a difficult process. Turns out when you're an adult with a lifetime collection of adult toys (no snickering, please) you can't just put five or six thousand pounds in the trash and have it disappear. You have to pay to have it hauled away, and when it includes electronics, it's classified as hazardous waste. Who knew?
Fortunately the end is near, and we may actual survive to enjoy it. Construction on our new abode is on schedule, and we've found a suitable rental to live in while the old place is brightened up and sold, and the new place is finished. Fast portal to portal moves are a thing of the past when I had access to corporate relocation services. Since I am long retired and don't have corporate clout helping us along, it's a long, unsettling process.
But RL still goes on. I'm still shipping copies of BRFS. I'll keep a small inventory out of storage and on hand to meet a reasonable number of book orders though there may be an occasional delay.
RL Steps In, Big Time (15 October 2018)
Real Life does that, you know. One moment you're cruising along, making great progress (at, say, writing) then there's a course correction. Everything changes. It's not that you're no longer making progress. You are. It's just a different sort of progress.
A few months back we were visiting the (now adult) kids in far away land where they have apparently settled permanently. While they were at work, we were driving around sightseeing and stumbled across a model home that spoke quite persuasively to us.
So now, progress is aimed at making our current home ready to sell, so that we can pay for our future home in far away land.
That's Real Life, you know.
Headphone Amplifier (16 July 2018)
Here's the assembled headphone amplifier. I've used the same size aluminum die cast box as was used for the microphone preamp. These boxes are inexpensive as well as robust, and they provide good electrical shielding.

Microphone Preamp (3 July 2018)
I've built up a battery powered microphone preamp in a die cast aluminum box.

The two batteries at the top of the picture supply the preamp. The lower five provide a nominal P48 microphone phantom power. The rotary switch selects between 20, 30, 40, and 50 dB of gain. The switch immediately to the right enables phantom power, and the left most switch turns the preamp on.
This was not terribly expensive. Even so, I'm sure I could have bought an import for less. However, I didn't built it to save money. I built it so that I that I am assured of its performance.
The next step is to build up the head phone amp in a similar box.
Microphone Prototype Body #2 (19 June 2018)
I've got a workable, "one piece" mic body suitable for a flat room mic or "measurement mic". I probably can't call it a true measurement mic since I don't have a traceable calibration file for it. It will have a JLI-61A electret capsule in the tip, and I expect it will be reasonably flat. The body is fairly narrow at the business end, so there shouldn't be shadowing or diffraction to worry about. If I had a real response curve for the capsule I could use that, but all I have is the nominal response curve that accompanies the spec sheet. It's starting point, I suppose.

The short piece of tubing on the right is the XLR connector with a circular shim glued to the outside of the connector shell so it fits snuggly into the mic body. The PCB carries your basic Schoeps circuitry.
The body is intentionally long to allow room for experimental electronics. You could easily cut two inches from the length by making better use of the volume in the body, but I'm lazy and this makes prototyping less of a pain.
Microphone Prototype Body #1 (12 June 2018)
The microphone electronics circuit board is long and skinny so that it will fit inside a body made from copper pipe. The initial body prototype is workable, but I've decided to alter the design before going further. I already see some improvements.


For some reason I had decided it was a good idea to permanently mount the XLR connector shell in the body. The insert would be removable, but the metal connector body, minus the mounting ears, would be soldered or epoxied into the copper pipe. The copper snout of the mic body would be removable for access to the circuit board.
One problem with the two piece body is that the junction between the two pieces begins to look a bit unattractive immediately after the first time it's disassembled. Another issue is the difficulty in keeping all the pieces nicely aligned during the initial build. Copper plumbing leaves a bit of a gap for the solder to wick into, and this allows pieces to wobble during the soldering process.
A one piece microphone body is now looking far better.
Microphone Electronics (7 June 2018)
This is the simple version of the microphone electronics.

The board design can support a FET cascode arrangement to reduce THD at higher SPLs. However, I've only partially populated this board. It's set up with a rather standard Schoeps configuration. The electret capsule is loaded with and powered through a 2K2 resistor. A JFET phase splitter buffers the audio signal and passes the resulting differential signals to a pair of PNP emitter followers. It's all pretty vanilla and works as expected.
Testing involved connecting this board to the mic preamp and the preamp to the headphone amp. It all runs off a pile of 9 volt batteries. I was wondering if I could get away without putting the preamp and headphone amp into shielded enclosures. The answer is not really. Even using batteries and twisted pair connections between boards, I can hear 60 Hz hum in the background. If I'm to make any sort of serious measurements I'll have to shield the circuitry.
I have a pair of diecast aluminum boxes that will hold the preamp and headphone amp. The microphone body, if things go according to plan, will come together from bits of copper plumbing and a hacked XLR connector.
Microphone Preamp (3 June 2018)
Here's the assembled, but untested, microphone preamp.

It's based on an IN217, and will work with an SSM2019 as well. Since I'm planning on using this for testing microphones, the gain is selectable at only one of four values: 20, 30, 40, or 50 dB. I've used paralleled 1% resistors to create the specific resistance needed for each gain setting. Having fixed, known gains allows me to better determine sensitivity of microphones being tested.
The circuit's pretty much textbook. It's got clamp diodes protecting the inputs and can supply P48 phantom power. It is intentionally colorless and flat. It's meant as a tool for investigating microphone behavior, so I don't want anything to distract from the mic.
I'll be running this on batteries, even the 48 volt phantom power. Five 9 volt batteries in series come in just within the low side of the P48 spec, 48 volts +-4.
I'll test the preamp along with the third JLCPCB circuit board (a microphone circuit) once I collect enough batteries.
Headphone Amplifier (1 June 2018)
The headphone amplifier on the JLCPCB circuit board is built and working. It went together almost without problems. I did miss tying an opamp pin to ground while creating the board design. An easy fix, but an annoying oversight on my part.

The amp uses parallel opamps to drive the output. It's a common enough approach, one that works very well with the NE5532. Good power output coupled with great frequency response and low distortion. What's not to like?
I tacked on a basic input buffer driving a "Baxandall" volume control. This arrangement places the volume potentiometer in both legs of the opamp feedback network. You get a very nonlinear change in volume from using a linear potentiometer. Normally you'd think of using an audio or "log" taper pot for volume control. Problem is, the so called log taper isn't. It's actually two linear segments back to back. A Baxandall setup is far better at producing volume changes that appear to vary smoothly to the logarithmic human ear.
Another advantage of the Baxandall volume control comes from the relative manufacturing tolerances of linear versus log taper potentiometers. You are far more likely to get dual linear potentiometers with good tracking between the two individual potentiometers than you are when buying log taper dual units. This results in better channel to channel volume tracking when using dual potentiometers in stereo amplifiers.
DIY Microphone Book (22 May 2018)
The content of the DIY microphone book is project oriented. That means I have to build prototypes. Obviously, there are microphones involved, but also there are some bits for testing microphones. While it's reasonable to expect that people interested in building or modifying microphones will have mic preamps and such, it's not to be assumed that the characteristics of these ancillary bits are well known or benign from a testing standpoint. When you're testing something, it's ideal to have everything else be as neutral as possible.
Turns out it's not particularly expensive or difficult to build high end ancillary circuits to help in testing mic projects. In particular, I'm referring to a mic preamp and a head phone amp. The preamp has a professional chip at its heart and has a stepped rather than continuously variable gain adjustment. The head phone amp is designed to have a flat frequency response so any coloration will be known to originate with the mic under test.
It's not hard to build these circuits on perf board, but it's easier and far more attractive to build on professionally made circuit boards. Cost has often been a deciding factor in favor of perf board, but that is now much less of an issue. After running across a number of YouTube videos that highlighted using Chinese PCB prototyping services, I decided to give it a try.
JLCPCB has a ridiculously good deal which is why they keep popping up in YouTube: Two bucks for ten double sided boards with solder mask and printed legends. Boards must be smaller than 100mm by 100mm. Plus they provide cloud-based board layout software for free.
At this price the cost of shipping becomes the larger expense. DHL typically runs ~$18 to the US. Airmail is maybe half that, but has significantly longer delivery times. I planned on sending in three different board designs to get the best use out of my shipping expense. I found that the $2 price applied as a special only to the first of the three designs. The other two were billed at $5, still not at all bad. Then, as I was a first time customer, JLCPCB picked up the cost of shipping via DHL. So, I got thirty boards for the grand total of $12.
Here's the obigatory picture of the box the boards came in.

And here are samples of what was inside.

From the top: mic preamp, head phone amp, electret mic electronics.
The boards look great. I may find mistakes in the layout work I did, but it doesn't look like I'll find issues with the board manufacturing.
The Writing Rabbit Hole (10 April 2018)
I'm back looking at the DIY microphone manuscript. This mostly follows my exploration of the topic. The thought is that it will serve as an introlduction to the hobby. It's not super technical though is does have a tech leaning. I'm thinking it will bring a reader from zero to well informed hobbyist in 70 to 80 pages. We'll see...
The Writing Rabbit Hole (18 March 2018)
My latest SF novel, Angel Resurrected, is now live on Amazon as an ebook.
Find it here: https://www.amazon.com/dp/B07BJFJ8YX

The Writing Rabbit Hole (10 March 2018)
Angel Resurrected has moved closer to being released into the wild. A few people have read it and not died from the experience. This is a good thing. Work proceeds on the cover.
The Writing Rabbit Hole (2 February 2018)
My science fiction novel (working title: Angel Resurrected) has crested 90,000 words and hit an important milestone; the story is complete. That's not quite the same as being finished.
Let the editing begin.
The Writing Rabbit Hole (16 January 2018)
A problem with writing projects is that there can be long periods with little physical evidence to show for the effort. I considered posting a picture of my cat, because this is after all the Internet, but I admit to being too lazy to chase her down. You'll just have to take my word that there are two fair size projects, and there's progress on both.
My "ancient technology wakes up and makes life interesting" science fiction novel has been the most recent time sink. The working title is Angel Resurrected. In it, bits of high tech debris have fallen to Earth. Not all of it is inert. Not all of it has fallen. Strictly speaking, none of it is benign. The manuscript has nudged past 83,000 words, and it looks like it will grow a few thousand more.
My nonfiction book on DIY microphones, with the working title, ah, DIY Microphones, is considerably shorter, but has a boat load of drawings. Essentially, this book documents my own exploration of the hobby side of do-it-yourself microphones. I'm not breaking a lot of new ground here, though I do add a bit. What the book does is gather together in one reference the technology that is key to the DIYers who build their own microphones. A lot of the writing is done. The next steps involve building and verifying a few projects for the book.
New Toy (31 October 2017)
Some large number of years ago I was quite near sighted and wore glasses. One of the few advantages was that without the glasses I could focus on small items held really close to my eyes. I had no problems seeing electronic components.
Time has changed that. I am much less near sighted. I can't focus on up close items, and electronic components have shown an alarming tendancy to become, literally, vanishingly small.
I tried hand held magnifiers and head mounted magnifiers. Finally, I bought one of these:

This is an AmScope model SE400X stereoscopic inspection microscope. It is far better than any other option I have tried. The "X" in the model number means the unit shipped with two sets of eye pieces, one for 5X magnification and a second for 10X. There are other options for greater magnification, but for the electronics work I do, that would be overkill. In fact, it would be a liability. A magnification of 5 clearly shows surface mount components while providing a wide enough field of view so I don't get lost on the circuit board.
A key feature of this microscope is that it focuses about nine inches below the objective lens leaving plenty of room for hands, tweezers, and soldering iron. The left eye piece has its own focus adjustment so if your eyes aren't identical (mine aren't) you can still get a well focused stereo image. The unit is solid and heavy enough to stay put on the bench. The goose neck LED lamp has more than adequate brightness. The fit and finish is a bit on the casual side, but for a sub $200 binocular microscope it's an effective tool for getting the job done.
A Stepping Motor and a Book (11 October 2017)
I finally got around to buying a couple of those ubiquitous geared stepping motors, the 28BYJ-48. These motors are favored by hobbyists and hackers. They're available in 5 volt and 12 volt versions, and many sellers also sell a tiny circuit board with a motor driver chip making the motor trivial to control from an Arduino or similar device.
Plus, they are dirt cheap.

The motors were designed to activate louvers or dampers in heating and cooling systems, so they are made by the millions with the result that the price has been pushed way down, even in small quantities. The cost of two motors, a pair of drivers, and shipping is generally around $6 or so.
The motor has 32 full steps per revolution giving a step size of 11.25 degrees. This can easily be half stepped to drop this to 5.625 degrees. The internal gearing provides a nominal 64 to 1 reduction which gives you a 0.0879... degree step size.
At first glance this looks like a perfect solution for low cost aircraft gauge simulation.
Well, almost. There are a few caveats.
First off, there is an annoying amount of gear backlash, perhaps as much as 2 or 3 degrees. For small engine gauges this is probably acceptable. For something like a 3 inch airspeed indicator, I'd find that much backlash a real distraction. For indicators that do not have freedom to continually rotate (like the ASI) the backlash could be controlled by using a spring to put a small load torque on the indicator shaft. For indicators that do have full rotational freedom (a DG or compass) you might want to look for a better solution. (hint: a 400 step per rev hybrid stepping motor can be half stepped to provide 0.45 degrees per step.)
A second caveat is that the 28BYJ-48 gear reduction is not 64 to 1. It's 25792 to 405 or 63.684... to 1. This may seem like pointless nitpicking, but suppose you don't care about the backlash and use this motor for some sort of continually rotating indicator. Because of the non integral reduction factor, there is no integer number of steps which will bring the indicator back to the exact same point after a "360" degree rotation. Yes, there are no doubt solutions to this, but it's something that will have to be taken into consideration or there will be a continually accumulating error.
So, is this a "no fly" recommendation?
Not at all.
The 28BJY-48 motor isn't a perfect solution, but with its ready availability, low cost, and ease of use, it's a device that should be in every cockpit builder's box of parts.
A number of years ago Jake Melampy produced The Modern Hog Guide. Many A-10 cockpit builders considered this book to be the best reference they'd seen.
Then it went out of print, and the asking price of used copies soared.
Fortunately, Melampy has released a second edition. It's bigger, and its price is down to earth.

Toy (12 September 2017)
Probably the most honest reason I had for buying this is that I had room for it on my workbench. I don't really need it. It just looked like a bit of fun.

It's fundamentally a gate array configured to run a direct digital synthesis algorithm. There's a small handful of support circuitry: a microprocessor, power supplies, display, and output amps, but conceptually it's pretty simple.
It has two outputs which can be selected among sine, square, triangle, ramp, or arbitrary waveforms loaded into its memory via USB. You can play with frequency, amplitude, the phase between channels.
It's really inexpensive, less than $50 delivered with cables and wall wart power module.
There are a variety of videos on line reviewing and dissecting this and similar models. To be clear, this thing is by no means a professional grade instrument. If you need a low noise, highly accurate/stable signal source, you should look elsewhere. But if you're looking for a low cost sig gen with a few bells and whistles thrown in, this might be worth checking out.
(I bought this through Ebay from TOMTOP Wholesale Market.)
Writing (11 August 2017)
The Ancient-Technology-Wakes-Up-And-Causes-Grief SF manuscript has nudged past 70,000 words.
Writing (21 May 2017)
One of the issues with being down the writing rabbit hole is that not much seems to happen for long periods of time, and there's not much of interest to post here, this being a techie electronicky kind of place. Still, I'm not dead, and I thought I'd poke my head up long enough to say so.
I'm writing a science fiction novel of the Ancient-Technology-Wakes-Up-And-Causes-Grief type. The rough draft has passed 50,000 words. It's looking to be 80~90,000 words for the full manuscript, so I'm nominally past the halfway point, and I'm still alive and I'm still writing.
Building, Writing (28 March 2017)
Last year I watched Steve Wagner on his YouTube channel as he built a Chinese electronic kit bought through Ebay. It was a single board component tester with a small graphic LCD display and a pre-programmed Atmel micro at its heart. It looked like a fun little project, it worked for Steve, and it was really cheap, under $15 delivered. So I bought one and promptly forgot about it.
Today I remembered it and built it. It is indeed a nice little kit with good quality components, though it's not without its shortcomings. Like the kit Steve got, mine had two 33K resistors supplied while two 3K3 resistors were called for. Other than that, no problems.
There is no assembly manual supplied with the kit. You simply plug parts in based on the markings on the board. Still, for what it cost, not a bad deal, and it worked the first time. Here's what I got:

And after about two hours, here's what I had:

It tests resistors, capacitors, inductors, transistors and diodes, measures frequency, and acts as a basic pulse generator. It's not something I actually needed, but it's a hoot to play with. If you're interested, it's a "W8Y2" component tester and as of today, it was still available on Ebay. If you're interested in Steve Wagner's video about it, it's #223 on his channel, "Electronics Trivia".
And I'm still working on my ancient-tech-wakes-up-and-causes-trouble SF novel. I wanted to make sure I could wrap things up so I thought I'd write the last 3~5,000 words. Well, that piece has grown to 30,000 words and that's with me leaving a few holes along the way. But it does look like the novel will wrap up cleanly and still provide a nice transition into a sequel.
The Reading & Writing Rabbit Holes (4 February 2017)
February already. How did that happen?
The most recent distractions are a couple of books and a new writing project.

I picked up another Douglas Self tome. Audio Power Amplifier Design is a very thorough investigation of the subject. Well written, comprehensive. If you have more than a passing interest in the topic you should have this book.
Empire Games is the first book in a series which follows the story line created in an earlier series by Stross. The underlying thread is the existence of parallel time lines and a limited number of people who can jump between them. The story covers what happens when governments, cultures, and people deal with the consequences. A very entertaining read. Annoyed that I have to wait a year for the next in the series.
I've cranked up another fiction writing project. I've always liked Ancient-Technology-Wakes-Up-And-Causes-Grief stories. Creating this type of story raises such interesting questions. If it's ancient, why does the technology still function? If the tech is an AI, how does it communicate? What are its goals? Why would the main character care? Does trust evolve? How? And if not, then what. Developing answers with internal consistency is a good part of the fun. At about 18,000 words so far, it looks like this project has some legs under it. It might just make it to the finish line.
The Writing Rabbit Hole (28 December 2016)
This all started a few months back when I started looking at cheap microphones. The original goal was a cheap mic for an amateur radio transceiver. I read about converting a really low cost knock off studio mic to radio use. This got me looking at DIY studio mics and preamps which got me thinking about headphone and studio amplifiers. There's a lot of information floating around and collating it got me thinking about writing it down which got me thinking about maybe publishing my notes... which naturally got me buying more stuff, just to make sure I hadn't left anything out.

It's been a really long time since I took a close look at this stuff. Electrets have gone from crappy replacements for crappy piezoelectric mics to solid performers having high end models providing true studio duty. Impressive.
Reading Distraction (3 December 2016)
The book on low level audio design arrived a few weeks back and sucked up a good chunk of my time. Anyone who has more than a passing interest in the topic will be familiar with the author's name, Douglas Self, and probably, with the book as well, Small Signal Audio Design.

There's nice coverage of noise sources in electronics, along with what causes distortion and what you can reasonably do about it. There is a surprising, to me at least, large amount of material about RIAA phono preamplifiers. I'm not particularly into vinyl, and don't really see it as a big DIY area warranting the coverage he gives it. But, even so, it's still good tutorial material in that he explains the design process as gain, noise performance, and frequency domain accuracy are balanced. Of course, Self covers a great deal more, and it kept (and is keeping) me reading for some time.
Good material, well presented, well worth the money to buy it and the time to read it.
AD9850 DDS VFO (9 November 2016)
While waiting for a book on low level audio design to arrive I climbed out of the rabbit hole long enough to add the remaining components to the DDS VFO board. I applied power and experienced 100% magic smoke containment. Yes, that's right, absolutely none of the magic smoke was released, and the board made pretty RF sine waves.

It's pleasing when testing goes that way.
This is a multi-purpose board. It can be used stand along as a stable signal source. It can be used as a radio local oscillator. It can also be used as the signal source in the "Poor Ham's Scalar Network Analyzer" (PHSNA).
The PHSNA also requires a logarithmic signal detector which is likely to be an upcoming project. Or maybe I'll doodle around with a DIY switchable attenuator. Hmm, or finish the spectrum analyzer...
Down the Rabbit Hole, Again (2 November 2016)
A couple months ago I built most of a BITX-40 QRP SSB transceiver. I've yet to build the power amplifier, but I couldn't transmit anyway because I don't have a microphone. Somewhat more recently I ran across a post by Steve, G1KQH, on AmateurRadio.Com. He described the BM-800 microphone, a (not really) professional studio microphone which could be adapted to amateur radio service. The main advantages of this device are its really low cost, its ubiquitous availability, and its pleasantly robust physical construction. (Oh, and yes, it does convert sound to electrical signals.) Steve further posted a link to an article by Pete, G4IZH, which details the conversion.
Peeks at Ebay and Amazon quickly showed just how ubiquitous the BM-800 is. It's marketed under several company names at a variety of prices even though it appears to always carry the "BM-800" model number. A slightly wider search turned up a number of reviews which were surprisingly up beat.
So, I bought one, and it doesn't look too shabby.

The fit and finish is a bit casual in spots, but overall, it looks like it will do.
This microphone requires external power, and as a (not really) professional studio mic, it's designed to work with the standard 48 volt phantom power one would expect to find in a (for-real) professional recording studio. Changing this to something more convenient is one of the steps in Pete's modifications. Another modification is to limit the bandwidth to something more suitable to amateur radio SSB, because the mic actually has the audio bandwidth one might expect from a studio mic.
I began to wonder just what it would take to use the microphone without modifying it, and that is when I fell down the rabbit hole.
The world wide web is a rabbit hole of truly gargantuan proportions. And of course there is wide ranging commentary on studio audio gear. Much seems to me to be wishful thinking and/or phantasy, but here and there I found nuggets that appeared to hold real value.
One that stood out was on a site which described a DIY microphone preamp. It advised that if the reader had come to the site looking for a way to improve the quality of recorded music: don't build the preamp, practice more.
Encouraged by this bit of honest advice, I continued slogging through, well... stuff, and found an excellent and most informative article in the form of the slides from a professional presentation titled "Designing Microphone Preamplifiers" by Gary Hebert of THAT Corporation. It was presented at the Audio Engineering Society convention in 2010. Given that the AES is a for-real professional organization offering membership to for-real professional audio engineering types, and that THAT Corporation is one of the suppliers of for-real high end audio studio gear used in for-real professional studios, the article had a certain gravitas for me (which is a snobbish way of saying, "no bullshit here").
Now, it's not like I need super quality audio from this mic. I am, after all, planning on hooking it to a low power amateur radio SSB rig. However, I find the engineering very interesting.
If you look close enough, everything, EVERYTHING is nonlinear, yet the goal of professional audio engineering is to develop equipment that faithfully reproduces sound without adding distortion or noise. Doing that requires the ultimate in linearity and noiselessness.
And what do engineers have to work with to achieve this? Transistors which are a pair of nonlinear diodes, one forward biased the other reversed biased, working in collusion, capacitors which change value and dissipate the signals they are meant to pass, and resistors that obey Ohm's Law, more or less but not quite, and, oh yes, add noise. The fact is, audio systems with superb performance do exist, and they are composed of these less than perfect components.
Learning how they come to be is what's keeping me in this particular rabbit hole.
AD9850 DDS VFO (24 October 2016)
The project is far enough along that it's starting to juggle electrons.

The scope shows a pretty nice looking sine wave even without the benefit of the yet to be built output filter. The blue LCD shows the frequency the Arduino has told the AD9850 to generate. The green display behind the LCD is a 6 digit frequency counter bought through Ebay for $10~12 telling me what it thinks the AD9850 is actually generating. They differ by 141 Hertz. Not at all bad considering neither the AD9850 nor the counter even pretend to be calibrated.
The two TO-220 devices on the board are voltage regulators. The board is powered by 12 volts which is used by the nonexistent output buffer. The 12 volt supply is dropped to 8 volts for use by the Arduino. The Arduino's regulator could take 12 volts directly, but using 8 volts lets it run a bit cooler as well as isolating it from any flickers and flashes that might come from some of the less than polite, really cheap, only nominally 12 volt wall warts I'll probably use to power the finished board. The 8 volts also feeds a 5 volt regulator which pumps suitably well behaved electrons to the AD9850 board and the LCD.
The left edge and upper left corner of the board are where the output filter and buffer will be. There should be three Pi attenuators in line with filter and buffer to provide good impedance matches between the sections and establish the correct output level. I have a great mound of resistors; however, to my great surprise, nowhere in the pile could I find the correct values for the attenuators. I could fudge something, but decided to wait until I could get something close to what I actually need. (What really surprises me, though, is that 1/4 watt, 1% metal film resistors are actually cheaper than 5% carbon film units. Who knew?)
The real magic happens underneath the board where the Arduino and the AD9850 DDS board plug in. To a large extent, the board is a baby size mother board (does that even make sense?). The board provides the interconnect wiring that ties the components together, as well as, offering a bit of shielding for the output filter and buffer on the other side.

I've been using Dupont style connectors which are certainly more convenient that soldering everything, but they're a bit annoying for the ease of plugging things the wrong way. So far no problems...
One thing I'd like to improve on is the bare copper boards. The darn things tarnish too fast. Somewhere I've got tin plate chemicals. Now, if I could just find them.
AD9850 DDS VFO (19 October 2016)
I've just hared off down another rabbit hole. I bought one of those Ebay AD9850 direct digital synthesis board a few months back, and for some reason it caught my attention again. Paired with an Arduino, it makes a nice little variable frequency oscillator.
I had already worked out the dimensions of the stackable connectors on the Arduino Uno board and had that in a TurboCAD file, so it was pretty easy to come up with a simple printed circuit board design for a VFO. This leans heavily on the Richard Visokey, AD7C VFO design, and draws also from the PHSNA Yahoo group effort.
The board will support the AD9850 module and Arduino on one side and an output amplifier and low pass filter on the other side. There's also a header for a two line LCD character display which will be mounted behind a suitable cutout in a yet to be designed enclosure.

This is the first board I've cut using an end mill. The earlier boards made on the CNC were machined with a V tip engraving tool. I think I like the 0.021 inch end mill better. It gives a very clean edge, and the width of the cut does not vary. It's difficult to keep the board flat so the final depth of cut varies across the board. With the V cutter this translates into variable width cuts. Since the end mill is the same width along its length, I get a constant width cut even if the board's not flat.
This is also the first board I've used double side tape to hold down to the CNC table. It seems to work reasonably well, but is something of a pain to remove once the cutting is done.
Spectrum Analyzer (12 October 2016)
The case for the spectrum analyzer is almost complete. There is some trimming that's needed on the top and bottom covers, and some nuts that have yet to be epoxied in place for holding the covers in place. With what I've got, I can now mount all the circuit boards and will soon begin the "final" wiring.
A view from the top...

And a view from the bottom.

At some point wandering through swapmeets, I bought a box of SMA terminated coax jumpers. I finally have a use for them.
The next steps are to complete the assembly of the Arduino shield, and to add power and control wiring throughout the box.
Spectrum Analyzer (5 October 2016)
The spectrum analyzer includes an Arduino which is used both as a system controller and as an interface to the computer running the graphing display. The Arduino will be supported by a breakout shield which is screwed to the lower surface of the interior floor using 1/2 inch standoffs. If that doesn't make sense, here's a picture.

The shield is only partially assembled. Some of the straight headers I used are old stock and have an oxide layer that's making soldering a less than joyful experience. I'll probably end up removing the offending headers and using newer ones.
The shield will have the trimmer for LCD contrast adjustment, a pair of voltage regulators, and an assortment of bypass caps. The spectrum analyzer runs on 12 volts supplied by a wall wart. The Arduino can operate from 12 volts, it has its own regulator, but since I'm powering the LCD and its backlight from the Arduino, I'll use an 8 volt regulator to supply the Arduino. This will reduce the load on the Arduino's internal regulator as well as providing a bit more isolation between the Arduino and everything else.
The 8 volt regulator also supplies the second regulator which drops the 8 volts to 3.3 volts, the supply voltage for the numerically controlled oscillator inside the spectrum analyzer.
Both voltage regulators bolt to the aluminum interior floor of the analyzer for heat sinking.
Here's a picture of the bare shield.

Back to the Spectrum Analyzer Project (29 September 2016)
I have finally made some real progress on the spectrum analyzer project enclosure. I'm using salvaged aluminum extrusion which formed the opening of a sliding shower door. The extrusion has a "C" cross section, and it works well as the sides of the SA enclosure. I have some 0.040" aluminum sheet from an ancient airplane project that never took flight, and that's being pressed into service for the top, bottom, and interior floor of the enclosure.

There are three compartments. There are two large compartments for RF modules and a smaller double height compartment for the Arduino, LCD and power supply components. I initially thought the enclosure was too big; there seemed to be so much wasted space.
Then I started out checking cable runs.
SMA connectors are small, but once you consider the overall length of the mated connector bodies, how they interfere with connectors from other modules, and limits on bending coax, the box begins to feel a little tight.
The front panel is the last piece I need to cut, but I don't yet know exactly where the holes go. That will depend on how I mount the Arduino, and that's turning out to be a bit trickier than I expected. Yes, there are mounting holes on the Arduino Uno, but there is very nearly zero clearance around those holes. I don't have suitable standoffs or other mounting hardware. I think hot glue must be a preferred mounting solution for many. Or maybe duct tape.
I'm planning on mounting the Arduino using the shield connectors, perhaps with a tie wrap as back up. Of course, that means I need another circuit board, which is what I'm working on now.
Audio Module (21 September 2016)
My project work seems to be bouncing around. No, that's waffling. My project work IS bouncing around. The BITX radio remains unfinished, as does the spectrum analyzer. Instead of working on them, I built an audio module.
It's a pretty vanilla project, just an NE5534 opamp for a preamp and an LM380 single chip power amp on the output end. It's not even my design. I shamelessly lifted it from Pete (N6QW) Juliano's site. It's part of his "simpleceiver" project. It struck me as a very useful module to have handy when working on radio stuff, so I decided to knock one out. The parts were on hand, so why not?
I built it using through hole components, but taking a surface mount approach. Why through hole components when I also have SMD parts? Well, I've spent about fifty years collecting them, and someone's got to use them. Why surface mount them? Uhmm, I'm too lazy to drill holes??
I designed the circuit board layout in TurboCAD, exported a DXF file to CamBam to make a G-code file and made the board on a homemade CNC machine. That gave me this:

The board came out almost perfect on the first attempt. The only issue is the mising "O" from the engraved label in the lower right corner of the board that should read as "OUT" instead of "UT". Turns out the "O" somehow was on the wrong layer of the DXF file and didn't convert to G-code.
Assembly took about two hours and was straightforward: bend leads, trim leads, solder part, blow on fingers to cool hot spots, repeat... then finally, this:

It works. Thanks, Pete.
BITX40 SSB Transceiver (11 September 2016)
The spectrum analyzer project is at the point where I need to make an enclosure for it, and rather than cleaning up my shop area, I let myself get distracted into another electronic project, building a SSB radio.
The BITX40 is a basic 40 meter (7 MHz) single side band transceiver which was designed with inexpensive components with the goal of encouraging people to get involved in electronics and amateur radio. This is not my design. That honor belongs to Ashhar Farhan, VU2ESE. You can read the details of the design here: http://www.hfsigs.com/
I decided to build it because I haven't built a radio from scratch for far too long, and I already had the majority of the parts for this design. I choose to built it "ugly style" because that's the fastest, easiest method.

The transmitter portion has yet to be completed (I haven't built the power amplifier), but the receiver works quite well. Using an inverted V antenna cut for 7MHz, I hear central state stations clearly (I'm in California) along with a few weak signals from the east coast. Not too shabby for a handful of cheap transistors (2N3904) and a 5 pole crystal filter made from computer grade crystals.
Spectrum Analyzer (7 August 2016)
I've wired a few more items to the Arduino and loaded the Arduino sketch that controls the spectrum analyzer.

There is actually very little used for local control. There is a single potentiometer which is used to adjust the center frequency, useful to make spot measurements, and a push button used to toggle resolution bandwidth and tuning speed. A short push changes bandwidth while holding the button changes tuning speed. At this point the Arduino appears to be doing what it should.
The next logical step was probably to wire the SI570 to the Arduino and verify its operation, but instead I decided to play with the second local oscillator.
The second LO is a crystal controlled 100 MHz oscillator that drives the second mixer. The fifth over tone of a 20 MHz crystal is used. Initially the oscillator did not work, and I spent a good deal of time looking for the most likely cause, construction mistakes. After all, the circuit had already been shown to work, I was simply building a copy. When that turned up nothing, I looked for dead parts. I replaced both FETs (MPF-102) even though both appeared to be behaving properly as far as self biasing went, but no joy there either. Finally I swapped both out for J-310s.
And it worked.
The documentation says that MPF-102s will work, but that was not my experience. My MPF-102s are very old; perhaps there are process differences with more current devices. Don't know. Fortunately I had decided to stock up on J-310s while I could still get them in TO-92 packages.
Spectrum Analyzer (1 August 2016)
The spectrum analyzer is controlled by an Arduino which also provides the USB connection to a PC or laptop which acts as a display. The Arduino also displays spot frequency and amplitude information on a 2 line 16 character LCD. My first attempt at wiring the Arduino to the LCD went poorly when I discovered I'd actually used a single line LCD.
The second attempt also had issues, once a 2 line LCD finally was delivered. I was just seeing random stuff displayed. At that point I was using what I thought was a proper sketch, but that turned out to not be the case. Locating the right sketch did not improve the situation.
I then tried adapting a tutorial "Hello World" style sketch which both worked and clued me in to the problem source.

Adapting the sketch required changing the definition of which Arduino pins were connected to which LCD pins. That got me looking at the drawing I'd been working from. I discovered that the data pin numbers on the LCD had been reversed. Easily fixed. On to more wiring and testing.
Spectrum Analyzer (9 July 2016)
I assembled the NCO board. Soldering the SI570 wasn't as bad as I thought it might be. At least, I don't think it was... I haven't put power on it yet, but I don't see any shorts though there probably is an excess of solder. Here's what the board looks like.

The SI570 will be controlled by an Arduino. Setting that up is the next step. I have an Arduino Uno floating around here somewhere as well as a couple of Arduino mini-micro things that were an impulse buy I added onto an Ebay order. I haven't done Arduino stuff for quite some time so these next steps should be interesting.
One of the questions concerns the proper signal voltage for the SI570 which runs on 3.3 volts. I don't know if it will tolerate 5 volts on its control inputs, or if my Arduinos are 3.3 or 5 volt versions. And then, of course, there are all the issues associated with downloading the current Arduino IDE along with the necessary libraries, and learning how to use them. I'm basically a hardware guy. I teach myself how to program once every ten years whether I need it or not. I'm getting kind of late in the current cycle.
Spectrum Analyzer (6 July 2016)
As I started to add components to the NCO circuit board, I noticed I had failed to leave room for a resistor and a capacitor. It would have been easy to bodge them in, but since I hadn't soldered anything at that point, I decided to correct the board. So, here we have version 2:

Spectrum Analyzer (5 July 2016)
I've made the board for the numerically controlled oscillator. It's basically the support structure for the SI570 which is a small SMD chip possessing almost as much complexity as the rest of the analyzer. It has its own crystal oscillator, an absurdly fast digital clock synthesis engine, a digital interface for the control logic, and an output buffer. It's remarkably small for what it does, and it's likely to be a real challenge to solder to the board.

I added an additional control line to the SI570. It has an output enable (OE) input which can be ignored as was done in the original design. I thought the OE pin might be of use later so I included it on the board.
An obvious possible use for the OE pin is to provide control of a tracking generator for the spectrum analyzer. The original design does not include a TG, but there's no reason not to. Its addition allows the analyzer to be used as a basic scalar network analyzer. It would require that the Arduino sketch be modified to add this functionality, but why not?
Spectrum Analyzer (2 July 2016)
The mixer board is now assembled far enough that it can be tested. It lacks the shielding which will be needed to limit noise pick up, but it should be more or less operational without it.

The signal input from the input low pass filter and the local oscillator signal from the SI570 numerically controlled oscillator enter through the two SMA connectors on the left. They are processed in a Mini Circuits Lab SBL-1 double balanced mixer. The SBL-1 output sees a resistive attenuator which helps provide a stable, broad band load, something DBMs really like. Then there's a MAV-11 amplifier which feeds a VHF band pass filter. The three (more or less) red coils are part of the filter. The filter output feeds a second SBL-1 mixer which down converts the signal to 12 MHz. That goes through a simple diplexer, a post amplifier and another impedance stabilizing attenuator before popping out the right hand SMA connector.
I've got one more board to design and fab before putting power to things.
Spectrum Analyzer (30 June 2016)
I've now got the mixer board engraved and drilled. This board has two RF mixers, two buffer amplifiers and a VHF bandpass filter on it. At ten inches, it's the longest of the spectrum analyzer boards.

There were a couple of minor problems fabricating it, but nothing that a little hand rework couldn't fix. I hadn't set the depth of cut deep enough for a few of operations as I wanted to limit cutting into the bed of the CNC machine. Seems I was just a little too conservative, but that's all been taken care of. The next step is to solder the components on it.
Spectrum Analyzer (27 June 2016)
The resolution filter for the spectrum analyzer requires a group of nine, nominally 12 MHz crystals that are all within 100 Hertz of each other. The typical hobby approach to finding these crystals is to buy a bunch of inexpensive crystals and measure them. Here's the setup I used.

I built a test oscillator that I could plug a crystal into, and I bought an eight digit frequency counter through Ebay. The counter cost something like $12 which is an astonishing deal. It may not be particularly accurate, but it's repeatable and stable enough to allow me to measure differences between the crystals. I bought a bag of 50 crystals, measured them, entered the readings into Excel, sorted, and selected a group that spanned only a 39 Hertz difference.
And here's the assembled resolution filter board.

Spectrum Analyzer (23 June 2016)
I'm working on the resolution filter circuit board. The resolution filter sets the bandwidth of the signal channel as the analyzer sweeps through the spectrum being investigated. With a narrower bandwidth you can see finer detail. Of course, there's a tradeoff. A narrower bandwidth means a slower scan rate. Typically, spectrum analyzers have selectable resolution filters, and this design is no different. This resolution filter is switchable between 300 kHz and 1 kHz bandwidths.
The center frequency of the filter is 12 MHz, and and an LC design is adequate for a 300 kHz bandwidth, though it does take five coupled LC resonators. The inductors are simple coils wound on standard toroids. The caps are standard ceramic parts.
Getting a 1 kHz bandwidth at 12 MHz requires a higher Q than LC resonators can reasonably provide. Here we find a good application for crystals. This filter is actually made of three cascaded, three pole filters composed of inexpensive crystals. The connections between the three pole filters is made with simple amplifiers.
While the individual crystals are inexpensive, the resonant frequencies must be within 100 Hz of each other. This is tighter than the manufacturing specs of cheap crytals, so you have to buy a lot of them, measure the resonant frequencies of each, and select appropriately.
Here's the bare board.

At 7" by 3.25", this is the largest board so far. It was a pain to make. I don't have a good way to hold down the material so the surface is flat. Since I'm trying to engrave to a depth of only 0.007", any deviation from flatness causes heartburn. I understand using double stick tape works well, but I don't have any. (Note to self: go buy some.)
It'll probably take a while to get this board built up as I've yet to build a test jig for checking out the crystals. I'm also waiting for a few more components to arrive.
Spectrum Analyzer Project (18 June 2016)
I've nearly completed the IF amplifier and detector board. I won't solder the detector chip in place until I've tested the rest of the circuitry, and I won't add the shielding until the detector's been added. All in all, the bulk of the construction work is done.
Here's the bare board.

There are a few errors in the board, but since I'm using 2N3904 transistors in a TO-92 package, the errors are effectively cosmetic. If I'd wanted to use surface mount MMBT3904s, I'd have had to re-do the boards. The leads of the larger transistors are long enough to easily bridge the problem areas. The SOT-23 package with its microscopic leads would not have worked.
Here's what it looks like (mostly) assembled.

Spectrum Analyzer Project (11 June 2016)
The second spectrum analyzer module I've built is a 100 MHz oscillator used to drive the analyzer's second mixer. Details of this are over on Ashhar Farhan's site.
This is a two JFET, crystal controlled oscillator. It gets its own module to prevent it from adversely affecting other parts of the analyzer, as well as to shield it from noise. We need the oscillator output to be pure, because any noise here places a limit on the analyzer's accuracy.
For this second module I used the CNC to do a bit more. In addition to engraving and drilling holes, I also had it cut the board free from the chunk of PC board stock. This is something I had done by hand when making the first module.

Like the input filter board, this board also worked out reasonably well. One improvement for next time is adjusting the locations of where the transistor leads are soldered. What I did here is workable, but it could have been better. This version uses real SMD resistors and capacitors. I used TO-92 transistors with through hole leads (because I had them), so I cut and formed the leads to make "faux" surface mount transistors.

And speaking of real SMD parts, these puppies are TINY, and I'm using the 1206 size, the "big ones". This is 'way different from my high school days in the distant past when I built projects with salvaged vacuum tubes and TV power transformers.
Spectrum Analyzer Project (9 June 2016)
It's time to build something different, and yet, the same in a way. Like all my projects it's something neat that I don't really need, but it's fun.
This time, a spectrum analyzer.
A spectrum analyzer is a specialized radio receiver that can scan a range of frequencies and tell you how much energy is at a given frequency. I built one years ago, but it's an analog version, and I've been interested in something with computer control and display. I thought about updating my old one, but hadn't gotten around to it. Then I found that Ashhar Farhan, VU2ESE, had already done so. If you're interested in this sort of stuff, I highly recommend you visit his site. He describes a low cost, easy to build, yet very useful device.
So, this is my implementation of his design. The main differences are that I will be using a CNC machine to make circuit boards, and I will be using more surface mount components.
The first module I've made is the input filter. It's simple, and it's a reality check on my overall approach. (I've never made circuit boards using my CNC machine.)
And, it seems to be working...
I used an engraving bit to cut through the copper on one side of a chunk of double-sided PC board stock. The small holes will be used to provide a low impedance connection between the ground on the top and the ground on the bottom of the board.

Here's the filter with the components mounted.

Each module will eventually be enclosed to provide tight RF shielding, but that will come later after I've had a chance to assure it's all working.
My SF Novel Is Now Live on Amazon (14 April 2016)
My new science fiction novel Contact, Again is now available as an ebook through Amazon. Here's the description:
She chose the star long before humans knew of it, long before there was a human colony on the star's pretty blue planet, indeed, long before humankind even existed. She came from far away, traveling through the starry darkness at a fraction of the speed of light, chilled to a temperature nearing that of liquid helium. It was the Great Voyage, the trip every seed made to found a new home, to become the matriarch of a new nest. After millennia of travel she awoke to a world that was everything she might have hoped for. Except that someone had found the world before her.
Corporal Stansurulahri of Sakura Island Search and Rescue arrived with her unit at the university's open air test farm to look for a young child who had wandered into the desert. They found her remains. Then the situation really deteriorated.
Seventy years later Toss Takahashi started his job at the mothballed Alien Incursion Research Station in the high desert, a job he didn’t want, working for people who didn't want him. Years earlier the station had been the site of furious activity looking for clues of the aliens that had briefly confronted the colony. Now the station is silent and largely forgotten, simply an automated monitoring system overseen by indifferent contract employees who know there are no aliens, because anything of interest was turned into radioactive ash long ago.
Tonight that will change.
http://www.amazon.com/dp/B01E82X502

Book Shipping Back to Normal (31 March 2016)
The shipping department is back to its normal one-business-day (usually) turnaround. All orders as of today has been shipped.
BRFS Still Available (19 March 2016)
HOWEVER, I'll be focusing on my daughter's wedding so won't be shipping books until about March 29.
Writing Milestone (17 February 2016)
I have (finally) completed the manuscript of my science fiction novel, tentatively titled Contact, Again. It's now undergoing the first of several "final" edits. Each pass through, I think "this is the last one", but there's always something else somehow. I'm sure that as beta readers send comments, there'll be more editing.
Contact, Again describes what happens seventy years after a disastrous initial contact between aliens and humans on the human colony world Sakura.
I wrote Contact, Again because I wanted a writing challenge. I wanted alien aliens that a reader could nonetheless empathize with, and I wanted a fictional world with constraints, so no FTL travel, no super powerful guns, no easy solutions. I wanted normal people, each with their own agenda. Seems to be working.
Copies of Building Recreational Flight Simulators are still available.
BRFS Still Available (23 December 2015)
Copies of Building Recreational Flight Simulators are still available.
DTS Revisited: Serial Interface (27 August 2015)
The issues with the DTS board synchronizing with an external 400 Hz power source have been laid to rest. The board automatically synchronizes, and in the absence of the 400 Hz signal, the board operates using its own internal timing. I've moved on to verifying operation of the board's serial interface.
The board has a chip location for an RS-485 receiver and a three pin header for connecting to its inputs. The receiver is optional. It's useful for long length cabling where electrical noise is a problem. The board also has a two pin header for connecting TTL-level serial data directly to the micro controller. This works well for very short connections where electrical noise has otherwise been contained, for example, an Arduino right next to the DTS board.

The firmware running on the DTS is based on the structure I've used in just about all my earlier micro controller FS projects. It provides a communication function that I expect to work well in this application. (And that expectation is probably why it won't.)
To test that expectation (and the anti-expectation) I've written a simple Arduino sketch that loops, setting both DTS DACs alternately to the maximum and to zero with a pause after each transition. Setting the Arduino up was generally straightforward. Likely the biggest effort was locating the stone age version USB cable that fits my old Arduino.
DTS Revisited: Synchronizing (20 August 2015)
The DTS board must be able to synchronize the 400 Hz sine waves with an external source. A synchro applies 400 Hz power to its rotor winding and the stator voltages must be of the same phase and frequency if the synchro is to operate properly.
Synchronization is a common function in many systems, so doing so here should be no problem; there's no apparent need to re-invent the wheel. However the desire to minimize cost and the choice to use a fairly low power 8 bit micro controller have made the project a bit more challenging. A phase locked loop is a common approach which would work well in other circumstances. While usually implemented with a mixture of analog and digital circuitry, it can be done completely in the digital domain. Sadly, that requires a bit more arithmetic horsepower than the DTS micro controller can bring to the task.
The lack of resources calls for a more brute force approach. The external timing reference is used to reset the micro controller code to the point at the beginning of the wave form generation process. A second bit of code has the task of adjusting the length of the generated wave form so that it matches the time between consecutive external timing pulses. This is a bit more complicated than it seems, because the external timing reference is certain to have noise on it and you really would prefer to not have the DTS outputs bouncing around in response to that noise.
The best approach so far appears to be two fold. For large changes in timing, a fraction of the difference between desired wave form length and actual length is added or subtracted from the count values controlling the micro controller timing. This is fast but to avoid responding to noise, it is designed to stop well before bringing the error to zero. A second bit of code accumulates remaining error, and when it passes a threshold, it increments or decrements the count values and zeros itself out. This is slower than the first process, but is heavily damped and doesn't respond much to noise.
DTS Revisited: Progress (13 August 2015)
The DTS board is now producing useful output. I have the bulk of the code running and have placed some test code to exercise the core functionality of the system: making 400 Hz sine waves with varying amplitudes.

The top trace is the "modified sine wave" signal as it comes from the DAC. The lower trace is what you get after it's been filtered. The fuzziness is due to the long exposure time coupled with the changing amplitude of the signals. The embedded test code ramps the amplitude through its full range.
The next step is adding code to synchronize the output with an external 400 Hz timing reference. For the DTS to be useful the two outputs must have the same electrical phase as the 400 Hz power applied to the synchro rotor winding. Of course, it's never quite as easy as it might seem. There is certainly no guarantee that the power will be exactly 400 Hz. So the new code must not only synchronize the phase of the outputs, it must also adjust the frequency to match.
As I began to write the code I realized I'd made a less than optimal choice of timers for establishing the core system timing, and hence the frequency of the outputs. I'd used an eight bit counter which meant I'd have fairly large steps in frequency when tracking the input timing reference. A bit of revision happened and I now have new, larger code that uses a 16 bit counter. I've tested it far enough to know that it still produces 400 Hz sine waves, but not to the point of knowing it will adjust the frequency. To do that I need to find my signal generator.
DTS Revisited: Theory & Progress (6 August 2015)
A key functionality of a digital to synchro interface is the ability to generate a pair of 400 Hz, nominally sinusodial, signals with amplitudes we can control. There are any number of ways to do that; however, a design constraint on this project is being low cost. Micro controllers are really good at making pulses with flat tops and low cost digital to analog converters are really good at controlling the amplitude of those pulses. If we spent more money on faster DACs and micro controllers we could make a fair sine wave, but it's cheaper to make something with a flat top and filter it.
The top waveform is what we're aiming for. The second waveform, a square wave, is cheap to make, and filtering it is not too difficult, but the third waveform is also pretty easy to make, and it has the advantage of being easier to filter. Square waves have a number of frequency components which are multiples of the fundamental frequency. A 400Hz square wave has the 400 Hz fundamental frequency that we want, plus 1200 Hz, 2000 Hz, 2800 Hz and so on. In fact, if the edges of the waveform are really vertical, there will be infinite odd multiples of the fundamental frequency, each with progressively smaller amplitudes.
The neat thing about the third waveform is that while it does have lots of odd multiples of the fundamental frequency, it doesn't have any of the third multiple; there's no 1200 Hz! That gives us more room to let the filter work. If we used a square wave we'd need a filter to pass 400 Hz while suppressing 1200 Hz and above. By using the third waveform we need only supply good filter suppression at 2000 Hz and above.

This third waveform is referred to as a "modified sine wave" by manufacturers of some types of commercial power inverters. I personally think that's vastly over selling its "virtues", but it is useful. It's possible to add strategically positioned notches to the pulses to remove higher order multiples, but that quickly begins to push the limits of the cheap microcontroller, so I'll go with the "modified sine wave" and see what I get out of the filter.
Some far I'm not seeing very much.
Zero, actually.
I just put power on the prototype today. The lack of smoke appeared to be a good sign, but only because I had not found a voltage regulator installed backward. It died quietly, with no fanfare at all. After that, it was finding out that the microcontroller configuration bits had not been set.
I'm going to halfway blame the config bits on the new IDE. I really should not have miswired that voltage regualtor (come on, the thing only has three pins, how hard could that be???), but the old IDE set the config bits for me. On the other hand, I did skip the set up wizard, so...
Progress. In fits and starts. (But no smoke.)
DTS Revisited: Assembled PC Board (30 July 2015)
The hardware is almost completely assembled. I've left off the output amplifiers so I can debug without needing a heat sink.
The board is mostly surface mount (SMD) though there are a number of through hole components. Using SMD components allowed me to keep the board small; a smaller board is a less expensive board. In some cases I went with the larger through hole components. The four blue caps at the top are an example. I could have used (slightly) smaller SMD caps, but I'd bought a bag of a hundred through hole caps a while back so through hole caps it is now. The three black TO-92 voltage regulators are through hole as well. They stick up higher but don't really take up much more (if any) board space, and once again, I already had a bunch of them. The white rectangle is an opto isolator which is available only in a through hole package.
And that orangey beige thing just above the blue widget? That's the ceramic resonator for the micro controller. I used a through hole version. I actually have an SMD version of the resonator, and the board is designed for it. But as I was assembling the board, I remembered what a pain in the butt soldering the SMD version can be. It has a large solderable contact area under the SMD package which requires getting the whole thing really hot, something my Hakko soldering iron with its teeny weenie SMD tip isn't really designed to do. So, I dug a through hole resonator out of the box, bent its leads 90 degrees and soldered it onto the board's SMD pads with zero trouble.

That empty 8 pin SMD location in the lower left corner is where the RS-485 receiver goes. RS-485 is a differential data transmission method with high noise immunity. If you're sending data over long cables, have multiple systems components with separate power supplies, or have varying or noisy electrical ground, RS-485 can side step a great many mysterious problems. Alternatively, you might have a DTS or three right next to an Arduino (with a TTL output) so you could just run a twisted pair directly to the PIC micro controller, which is pretty much what I'm planning as I debug.
Of course debugging assumes I have firmware running on the PIC which is not yet the case. I've succeeded in importing some old PIC code into the current version of MPLAB X, the Microchip IDE. This will help, but I've still got a lot to do, and RL is making other demands. Perhaps over the next several days or few weeks I'll have enough running to show whether or not this DTS approach will work.
DTS Revisited: PC Boards & Parts (23 July 2015)
The prototype circuits boards have arrived. They look pretty good.

There's been an almost steady stream of packages arriving over the past few days, so I have most or all of what I need to assemble a working board.

The above is just a sample of what's come. The chip is a dual channel voltage output digital to analog converter. The resistors and capacitors are an example of me getting carried away. Rather than taking the time to track down part numbers of only what I need, I ordered assortments through Ebay. It's orders of magnitude more than I need, but it's so CHEAP. And this way I have alternatives if needed as I debug. Or maybe the truth is that even though I'm a retired engineer, I still geek out about this stuff.
I also bought an updated PIC micro controller programmer. I've used a PICKit2 for years, but that's now obsolete. Actually, it would work just fine for the PIC16F648A that I'm using, but I lost the software for it. I upgraded my computer some time back and the PICKit2 software didn't make it past the transition. After making a half hearted effort to find it, I bought the updated PICKit3 knowing that it would come with software.

Other than being red and having a "3" on the front of it, it looks pretty much like a PICKit2, though according to MicroChip, it can do more. In any case, I got one.
I also had to download the latest version of the MicroChip development environment. Naturally it has changed greatly from the version I used a couple years ago. It also came with a chunk of software to run the PICKit3, so of course now I'm wondering if it is backward compatible with the PICKit2. Hmm??
Next steps: break out the solder and magnifiers, and read the MicroChip MPLAB X IDE docs.
DTS Revisited (16 July 2015)
Okay! I have a circuit board layout for DTS 2.0.

The design is at the dangerous stage. Everything looks finished, but it almost certainly has mistakes in it. So, tempting as it is to fire it off to a proto fab house, I need to check it again.
DTS Revisited (9 July 2015)
I now have a more or less complete schematic for a reduced cost digital to synchro converter. I've taken a different approach from my last design.
A key function of any synchro signal generator is to produce two (nominal) 400Hz signals which are electrically in phase with the synchro rotor voltage, but have different amplitudes. Variations in these amplitudes encode the synchro rotor position. Commercial synchro signal generators use high resolution digital to analog converters along with assorted electronics to control the amplitudes. Really accurate, but also really expensive.
An approach that's been used in the hobby community (myself included) is to take a sample of the 400Hz power and scale it using devices like multiplying DACs, digital potentiometers, and voltage controlled amplifiers. Using a sample of the power that will feed the synchro rotor assures that the generated synchro signals will be electrically in phase with the rotor signal. Good performance at less cost.
The approach I'm taking is to generate the 400Hz signals from scratch and use firmware to keep them in phase with the rotor power. This shifts some of the hardware complexity into software. Here's a block diagram.

Eight bits of resolution per DAC (digital to analog converter) will give you about one degree resolution on the synchro shaft. This is good enough for a 2 inch engine gauge, but a bit coarse for something like an ADI. Ten to 12 bits is far better if you're aiming for smooth motion. If you were looking to produce a high quality sine waveform straight out of the DACs you'd be looking at a requirement for something like 16 to 18 bits, plus you'd need a micro controller capable of pushing data to the DACs at a fair speed. Since the micro controller has other things to do as well, we'd likely need more expensive hardware.
Or we could cheat.
We can produce a 400Hz non-sine wave and filter it. That lets us use the full resolution of the DACs to control the amplitude and ignore the wave shape. So the trade off is using cheaper hardware at the expense of adding low pass filters to clean up the waveform. And what do these filters cost? About 60 or 70 cents (total for both). A quad opamp costs roughly 50 cents. the resistors and capacitors add a few more cents if you buy the huge Ebay assortments.
With the circuit drawn out the next step is to design a circuit board....
DTS Revisited (2 July 2015)
Synchros are used to send mechanical angular data across electrical wires. They are old, old tech. They are also reliable, robust, and accurate. Modern day incarnations are widely used in situations requiring reliability, robustness, and accuracy, so not too surprisingly you find them in avionics.
Also not too surprising is that flight sim enthusiasts are often interested in synchros, or at least, in the signals that make synchros do their thing. If you can make synchros operate, you can, in many cases, make real aircraft instruments operate in a simulator.
Several years ago I designed a digital-to-synchro converter that does just that. It's described in Building Recreational Flight Simulators. Recently, there has been an uptick in interest levels regarding these sorts of devices, and that has caused me to revisit my old project.
There are any number of ways to generate synchro signals, but cost easily floats to the top of the important criteria list when sorting through options. If you have a lot of real aircraft instruments, you need a lot of DTS converters, and even a moderate price becomes unappealing when you need ten or twenty of them.
In the years since designing the original DTS, micro processors have become more powerful and less costly. Other parts have become less available and more costly. Surface mounted components are a pain to work with because they are so small, but can be really cheap, plus can reduce the cost of the circuit board because it can be smaller too. Some components are only available in surface mount packages... anyway, big changes.
So now I find myself revisiting the DTS project looking for cheaper ways to build it.
CNC Project: Electronics bay doors (25 June 2015)
Well, they're done. The painting is less than perfect, the simple act of my holding a spray can seems to magically attract dust from miles around. Nonetheless, both doors for the electronics bays have been fabricated, painted, and installed.
CNC Project: Annoying problems (18 June 2015)
The computer problems with the CNC machine have not gone away, but they aren't so large as to prevent me from using the machine. Basically, it seems if I run LinuxCNC long enough it will die. I think the ultimate cause is the hardware (and associated drivers) it's running on, though I'm by no means sure.
I installed the most current version of LinuxCNC which also meant moving from Ubuntu to Debian. LinuxCNC is released in many ways. The easiest for me is to download an ISO image that incorporates the operating system with LinuxCNC. So, I moved from an operating system that I know very little about to another OS I know almost nothing about. However, now I have a very clean installation. I had added various other programs and updates to the earlier installation. Now I know that any further issues are not due to random other programs. Also Debian has been a bit more friendly in providing information when problems do appear.
And appear they did. About 40 minutes into a test run, the latest, greatest LinuxCNC died.
LinuxCNC expects the computer to be running a real time operating system. Linux is supposedly pretty good at emulating that, but it's not perfect. Depending on the specific hardware in the system, the drivers may not always play well together when rapid swapping is required. I have some indications that this is the base cause of my problems, but I don't know enough about LinuxCNC or Debian (Or any Linux distro for that matter) to be sure.
I decided to use LinuxCNC because it's available for free and I had an apparently useful old computer to run it on. My focus was and continues to be learning about CNC milling. Now that the CNC machine is working, I'll put a little effort into stabilizing LinuxCNC. If that turns into too much of a time sink I'll look at other options, like running a G-code interpreter on an Arduino.
So far I haven't run into catastrophic problems with milling tasks in the 15 to 20 minute range. I successfully milled the ventilation slots into the second electronics bay door.

The material is .063" aluminum. Depth of cut per pass was .017" so four passes were required. I used a .125" carbide single flute end mill and a feed rate of 20 inches per minute.
CNC Project: Fans (11 June 2015)
Adding fans has made a world of difference. Even after a half hour of milling the motor driver heat sinks are only slightly warm to the touch. Better yet, the machine no longer appears to be dropping steps. I mounted a pair of fans on a chunk of sheet aluminum hinged at the bottom. This also supports the 12 volt power supply for the fans, as well as, the emergency stop button. This fixed the last known problem.

It also uncovered the next.
Once the machine was able to run for extended periods of time, the computer began to shutdown my session. This appears to have something to do with the idle timeout period and screen saver. At least, setting the idle timeout threshold to two hours seems to have stopped the behavior. The confusing part is that I've had the screen saver pop up on smaller CNC runs and not had a problem, but somewhere around 15 or 20 minutes into a larger run my session would completely disappear.
I've made one 35 minute run with the 2 hour idle timeout setting, and had no problem. So, maybe the issue has been resolved. If not, I'll do a reinstall of LinuxCNC. There's a newer version and I probably should move to it anyway.
AHCP Text Success, Almost (4 June 2015)
Reducing depth of cut and feed rate made a great difference in the text quality. Using a better cutter resulted in further improvements. I can now produce excellent engraved characters most of the time, though the poor picture quality below doesn't show it.
I experimented with .025" and .0197" carbide end mills and .015" V- groove engraving cutters. Each produced credible results under certain conditions. For the size and style I'm looking for the .0197" end mill does best.

The above tests were done on painted acrylic. The tests below were done on unpainted acrylic, which makes the results particularly difficult to photograph. The characters really need to be viewed though a 30X magnifier to judge the quality. When you do that you can see how straight the cuts are and how clean the grooves are.

What I'm working toward is duplicating the type of light plates that were made during the 1950s and 60s. These light plates had mechanically engraved characters which were backfilled with white paint. I've seen videos of the manufacturing process showing workers using a microscope and a very fine gage blunt hypodermic needle to fill the engraved characters with paint.
Sadly, I don't have the microscope or needle to do this. And, I certainly don't have the steady hands for it. Fortunately, none of those are strictly necessary if you're willing to be a little messy. I filled the "BARO, DELTA, and RADAR" text above by slopping paint on and wiping up the excess. And while you can't see it, I did the same on some of the test lines in the upper picture too.
At this point I thought I was ready to make a complete AHCP panel, so I started cutting .25" acrylic and milling holes. This is a somewhat longer process than engraving text, and I ran up against my current problem: overheating the motor drivers. At least, that's what I think is happening. Cutting starts off great, the motor drivers get hot, and the motors begin losing steps.
I'm using a Gecko stepping motor driver with heat sinks, but I don't have it oriented properly for good convection airflow. The plan was to have fans mounted on the electronics bay door to push air over the heat sinks. I just never actually got around to making the door, so the fans... well, they're nowhere near the heat sinks. Apparently this is something I need to change before I can go much further.
AHCP Text FAIL (28 May 2015)
No pictures. Too embarrassing.
I created a more or less complete drawing file for the A-10 Armament HUD Control Panel. The text engraving is the most difficult part, so I created a G-code file of the text for use in a test. The idea was to engrave all of the text on a piece of scrap acrylic then carefully scan the results with a magnifier to judge the results.
Magnifier not needed!
The waste acrylic melted to the cutter and ruined the engraving. I was lucky to have been able to halt the test before the cutter broke.
I did find that my G-code had errors, the depth of cut was far larger than I wanted, but even so, this is unexpectedly bad.
Craft Table and Torch Clamp (21 May 2015)
I've spent the last week or so building a craft table for my wife. She's interested in lampwork beads, and that means she needs a safe place to work with molten glass. Since we didn't have any flameproof tables, I've been building one. Fortunately it doesn't need to be completely flameproof; sheet metal over a wood surface is apparently good enough.
Since she'll be using a small torch, I also built a clamp for fastening the torch securely to the table edge. The clamp that came with the torch did not inspire confidence. I used the CNC machine to cut pieces from 3/4" plywood which I glued and stacked. The clamp fastens to the under side of the table front edge. I embedded T-nuts in the edge just for this purpose, and to allow quick and easily removal.

Note that the table is upside down. The wife does not normally make lampwork beads while standing on her head.
And I don't normally cut 3/4" material on the CNC machine, so I hadn't noticed that there is an apparent tilt in the Z-axis. I thought I had the Z-axis plumb to the work surface. That appears to not be the case.
Sigh.
CNC Project: Yet another test engraving (14 May 2015)
The CNC machine is back together, complete with the exception (predictably) of the door for the electronics bay. I really should take care of the door, but that's too much like work, no fun at all.
Instead, I did another engraving test, this time of printed circuit board stock, and (again, predictably) things didn't quite work as expected.
The reason for using PCB stock was to avoid the distraction of paint chipping at the edge of the cut. I simply wanted to see how smooth the cuts would be. I used a V-groove engraving cutter and set the depth of cut to 0.005". What I found was that my clamping method distorted the PCB stock so that the actual depth of cut varied. PCB material probably would be better held by double stick tape. I also ended up with a somewhat ragged edge to the cut. Basically. I left one problem behind and added two new ones. I should have just tested on unpainted acrylic.

Still, the test wasn't a total loss. I was able to salvage it by removing the ragged bits with a bit of 600 grit sandpaper and oil. What I was particularly interested in was seeing just how straight the nominally straight cuts would be. The machine uses micro stepped stepping motors to move the cutter. The machine has a theoretical resolution of 0.001"; however, stepping motors don't always provide equal size micro steps. What I see in the test cuts are slight variations from a straight line on some of the diagonal cuts. I have to use a 30X loupe to see them, but they are there. I don't think this will be a problem. The smallest characters in the picture are 0.1", and they look pretty good. My main issue is likely to be selecting the proper cutter and speeds for clean cutting.
CNC Project: Just loose ends now (7 May 2015)
It's back together and it's cutting. I wrote a simple G-code program to mill the surface of the waste board. I started by taking it down 0.01", and was surprised when that didn't quite do it. A portion of the center was untouched. Another 0.01" took care of that, and now it looks pretty good. I did find that I'd been over conservative in placing the limit switches. I should have had 15" square of cutting area. What I've actually got is a bit under 14.5" square. Not really a problem; if I get enthusiastic I'll change it.
What's slightly more pressing is finishing the window installations on the cover. The plastic is cut to size, more or less, and should be glued in place with a bit of silicone RTV. The electronics bay, on the side of the machine, should have a door with fans, vent holes, and an E-stop button.
So, pretty much, it's done. I'm sure I'll add a few more things (like maybe some LEDs for lighting the work surface), but once these loose ends are cleared up, it's on to using the CNC rather than builidng it.

CNC Project: Adjusting (30 April 2015)
I have the CNC machine sitting on the cabinet. This has allowed me to level the bed of the machine and pour a layer of epoxy table topping.

The epoxy layer forms a flat surface, much flatter than the plywood it was poured over. This gives me a reference surface for adjusting the rails. I had initially set up the machine using a tape measure and the nominally flat plywood surface. I got marginally okay results. This approach is working much better.
Rather than a tape measure, I'm now using a dial indicator. It's a cheap one from Harbor Freight, but at $15 and with 0.001" resolution, it's hard to beat. I made a stand from leftover bits from building the CNC machine. I also made a bracket that holds onto the steel rail with a magnet.

The indicator doesn't tell be the absolute height of the rail from the machine floor. It shows me the differences in height among various locations along the rails. This will let me tweak the rails so that they are all parallel with the CNC floor.
CNC Project: Watching paint dry (23 April 2015)
As exciting as it sounds.
It is progress, however. The cabinet is done, with the exception of the door, which will happen when I have the material at acceptable cost. (Probably leftovers from an upcoming laundry room cabinet project.) I painted the CNC cabinet with a random, off white acrylic enamel found in a rusty can beneath a few years' accumulation of dust. It's good paint, I just want to give it adequate drying time before I plop the CNC machine on top of it. I don't want the soft paint to glue the CNC machine to the top of the cabinet.
In the meantime, I'm completing the hinged cover for the CNC machine. It provides sound isolation and dust containment. It was mostly done some time ago. I'm doing a bit of prep work before painting it which I expect to be, once again, just as exciting as it sounds.
CNC Project: Cabinet, etc. (16 April 2015)
Not a very productive week. House related projects and jury duty muddied my focus.
The cabinet is missing doors and paint, but is otherwise complete. I have parts cut for a removable shelf which was to hold the computer monitor; however, I've changed my plans. The shelf was to hook onto a pair of brackets on the side of the cabinet, but I like the otherwise clean lines of the cabinet, I don't want the brackets ruining that when I take the shelf off. Yeah, I know. Pretty lame for a shop base cabinet built mostly of leftovers that'll never leave the garage, but Hey! It's my cabinet and my garage. So, now I'm going with a pair of 1/4"-20 bolts to fasten the shelf to the cabinet side. When I remove the shelf there'll only be a pair of small holes.
CNC Project: Cabinet (9 April 2015)
The CNC cabinet is very nearly complete. I'm waiting for the glue to dry on the keyboard tray, the last major item to assemble. There are a few smaller things to glue together, but nothing big, just little, time consuming things that I don't have enough clamps to do all at once. I haven't decided what to do about painting. Maybe I'll stick with the "build it out of leftovers" and use whatever I find lurking in the corner.
I made the adjustable feet yesterday using bolts, nuts, washers, and scrap wood.

The hardest part was drawing the hexagon for the pocket to accept the bolt head, which is to say, having the CNC machine made the whole process pretty painless.
CNC Project: Cabinet (2 April 2015)
The CNC machine is a "table top" unit. Building the machine presupposes having a "table" to put the machine on "top" of.
Houston, we have a problem.
I don't have a clear spot large enough for the machine. It's currently sitting on a pallet of boxed books. Before that, it was on the table saw. I can just barely operate the CNC machine where it is, but can't get access to put some finishing touches on it. The current position also restricts access to the radial arm saw. So, I've finally taken the time to build a base for the CNC machine.

It will have a pair of side by side drawers, a full width keyboard/mouse tray, and space for the computer. There will be some sort of removable/foldable/??? shelf on the side for the monitor. The whole thing will be supported by adjustable feet for leveling, or castering wheels when the feet are lifted. As much as possible, I'm making it out of left overs from other projects. I did have to buy the wheels, but I'll probably make the adjustable feet.
CNC Project: More engraving (26 Mar 2015)
The .021" end mills have apparently not been shipped yet, but a few .0231" end mills did show up so I'm working with them. I created a basic single stroke font and ran it with pretty good results.

This was a quick and dirty font build. In fact, it's not really a font, per se. It's simply a collection of lines and arcs that generate G-code for single stroke characters. The image here makes the stroke weight appear heavier than the actual engraving looks. I'm quite happy with the outcome.
The characters in the top line are about .19" tall. I recall reading somewhere that most labels on military light plates are .1875" tall. (I'm at the point where I need to dig up the real numbers and make sure.)
The characters to the right are multi-stroke, and are clearly too heavy. The test pattern is the same as used before (single stroke).
This engraving was done on an area that was not sanded as well in preparation for painting. I notice a slight tendancy for the paint to fracture at the edge of the grooves. So, although the paint used claims to adhere well to plastic, proper surface preparation still pays off.
CNC Project: Engraving plastic (19 Mar 2015)
One of the goals for the CNC machine is using it to produce light plates. Cutting acrylic plastic to shape and making holes are not problems. The real challenge is producing good quality text. I've done several tests to find the best cutters and machine operation to do that.

The bottom line of ABCs is the first test. It was cut with a standard V-groove engraving bit with a .015" tip. The test material is acrylic plastic with a coat of white paint covered by two coats of black. I had lightly sanded the plastic under running water to aid in paint adhesion. Depth of cut was .015" while feed rate was 30 ipm.
The good news is that the characters look good (not great) from a distance. They are quite legible and the islands of black in the A and B are all fully intact.
The bad news is that there is a significant amount chip re-welding in the grooves, and there are wiggles in edges that should be straight.
Chip re-welding is often caused by feed rate being too low and/or cutter speed being too high. Wiggles in what should be straight cutter movement can be caused by too high a feed rate given flexibility or looseness in the structure holding the spindle, or crap on the X or Y rails, or ???
The middle line is the second test. I created a simple test pattern to look at basic cutter motion, and I reduced the size of the characters to make them more difficult to cut well. I also dropped the feed rate to 10 ipm. While cutting, I directed compressed air over the bit to aid clearing the chips from the groove.
The diagonal lines in the test pattern were used to show any issues in the capability of the stepping motors to move the spindle. The configuration of pulleys, timing belts and microstepping in the CNC machine provides a resolution of .001" in the X-axis and Y-axis. However, there's no guarantee that actually gets delivered to the spindle. What the diagonal cuts show is quite pleasing. While the cuts are not perfect, I can only see the imperfections by using a 30X magnifier.
The quality of the characters to the right of the test pattern show the benefit of the lower feed rate and the use of compressed air. The character shape is better and the re-weld problem has been substantially reduced.
The third test, the top line, replaced the V-groove engraving tool with an end mill cutter. My expectation that the end mill would clear chips better was shown to be true. Unfortunately I only had a .031" end mill so the character stroke width is too great.
I have some .021" end mills on order, and that will be my next step.
CNC Project: Inching up the learning curve (12 Mar 2015)
Reducing the feed rate when milling small holes using an end mill has resolved the out-of-round issue. I've moved on to making more parts, some out of aluminum, and discovering more issues.

The two pieces on the lower right are the lens and spacer for a basic single pointer gauge. The piece at the top right is a circuit board prototype from a few years back that supports an automotive, stepping motor style pointer movement. The board has a surface mount micro controller, an RS-485 transceiver, and a motor driver on the back. The three pieces on the left are the aluminum faceplate, legend deck, and rear plate. These pieces stack together with a few off-the-shelf threaded spacers to form the gauge.

The four screws holding the front together are supposed to be countersunk flat head types, but I didn't have any on hand when I was taking pictures. Aaand... there are a few parts missing as well. But, the intent here isn't to make an instrument; it's to discover pitfalls while using the CNC machine to make flight sim parts.
The most recently discovered pitfall is that the CNC machine work surface isn't properly aligned with the cutter horizontal motion.
Okay, well, I knew that. I just sort of forgot.
I could have milled the spoil board flat, but I decided to wait until I did a final leveling of the CNC floor. The construction directions call for using epoxy table coating to form a flat surface. I skipped that because of cold weather. Alignment of the machine is supposed to be done in reference to this gravity flattened surface. Well, that hasn't happened quite yet.
When I cut the aluminum gauge pieces, cuts on one end of the stock cut just barely through, as I'd intended. At the other extreme, cuts were almost there, but still far enough short to be a real pain. I can certainly increase the depth of cut, but that solves only this type of work.
I also plan of using the CNC to do rotary engraving. Depth of cut is critical for good engraving so I'll need to resolve this issue. In the short term, I'll shim the spoil board. When the weather warms a bit more, I'll mix up some epoxy.
CNC Project: Somewhere on the learning curve (5 Mar 2015)
This is maybe not the most awe inspiring thing to be made on a CNC router, but it's a step further along the learning curve. If you look closely you'll notice that the holes are slightly out of round. This is something of a mystery, but I think I have an explanation.
The holes should be 5/32" in diameter. The narrower dimension is pretty close, but the hole is not round.
The software that creates the tool paths generates a downward helical path so that an end mill can carve out a hole larger than its own diameter. One of the parameters that the software uses is a feed rate which it tries to maintain.
The CNC machine is a gantry type. One horizontal axis moves the spindle along a rail bolted to the gantry. The other horizontal axis moves the gantry. That means one axis moves the mass of the spindle while the other moves the mass of the gantry PLUS the mass of the spindle. The same type of motor and timing belt is used on both.
The CNC machine will cut a large radius curve with no problem; however, cutting a small radius curve at the same feed rate doesn't works as well. The forces needed to move the spindle through a curve go up as the curve gets tighter. The timing belts stretch slightly as the motors accelerate and move the spindle. Because the motors are moving different amounts of mass, the amount of stretch on each axis differs. As the curves get tighter and the forces on the belts grow, the difference in stretch becomes significant, and, so the theory goes, holes become increasingly out of round.
A next step is to cut some small holes at lower feed rates and see what happens.
CNC Project: Software (26 Feb 2015)
The CNC hardware is now functional. I'm sure to be tweaking and adjusting, but the machine fundamentally works. I can jog the tool position from the keyboard and clean the fault when I run up against the limit switches. The focus now moves to software.
I'm using LinuxCNC as the machine controller. Mach 3 was another option, but LinuxCNC has the advantage of being free. As long as it does what I need it to do, there's little reason to change. My goals with CNC currently are cutting and engraving plastic, and light machining of aluminum. It looks like LinuxCNC can handle that. If my goals change, I may look to other machine controlling options. For the time being I'll invest the time learning LinuxCNC.
LinuxCNC takes G-code as its input to direct the CNC activity. While it's possible to write G-code by hand, that get real old very fast. The productivity boost from using good CAM software is far too valuable to ignore. I'm leaning toward CamBam. I might be able to get away with a simple G-code interpreter munching on DWG drawing files, but the more integrated approach offered by CamBam has more appeal for me. I like that I can import or create, and edit the drawings then direct the creation of tool paths before generating the G-code.
At this point I have only a cursory understanding of LinuxCNC or CamBam. I need to change that.
CNC Project: Motor driver (19 Feb 2015)
I'm using a Gecko G540 microstepping motor driver. I chose to buy rather than build the electronics because one of my goals with this project was to learn about CNC, and I didn't want to get distracted. Buying the G540 let me focus on stuff new to me.
The G540 is a nice compact package which will run fairly well as is, but adding heatsinks is recommended if you plan on pushing the drivers near their limits. The three heat sinks stick on the bottom with thermally conductive adhesive pads.

At this point everything critical in the CNC box is together. I'll eventually finish the top for noise and dust control, but first I'll pull the computer together that will run LinuxCNC and control the machine.

I'll also need to add a door with fans over the electronics bay. The bay is not quite big enough to mount the G540 with the heat sinks vertical which is seriously non-optimal for air movement over the heat sink fins. The door will also provide a mounting surface for the emergency stop button.
CNC Project: clamps & cables (12 Feb 2015)
The work piece hold down approach uses aluminum C-channels within the spoil board to hold the heads of 1/4"-20 bolts.
You can use fancy threaded knobs,

or if space is limited, a standard nut will do.

Aluminum C-channel is widely available, standard fare. I picked this stuff up through Ebay.
Wiring is the primary remaining task. I'm making progress, but there's more to it than simply making electrical connections. It's more an issue of cable management.

Two of the stepping motors, the spindle motor, and several limit switches are mounted on a moving gantry. The cables connecting them must be supported so they don't get in the way of gantry movement or get hung up on the work piece. This has been somewhat complicated by the fact that the stepping motors have short leads with a molded plug. I suppose I could have cut the plugs off and extended the motor cables, but I chose to use ready made extension cables, and add a few tweaks to support the joined plugs.
A secondary issue is that since the gantry moves, the cables must be rated for continual flexing. Standard stranded wire will tolerate flexing while being installed, but will break if flexed enough. Unfortunately, the wire I was planning on using to connect the limit switches falls within the "standard stranded" category. I have some microphone cable on order which will work well for this, but until it shows up, I won't be able to complete the wiring.
CNC Project (5 Feb 2015)
The Z axis limit switch has been mounted.

And the power entry entry module has a mounting plate.
Wiring is an obvious next step, but I took a detour and have been working on the spoil board and work-piece hold down clamps. The weather warmed up enough to open the garage door and use the table saw, so I took advantage of the opportunity. The spoil board is more than just a chunk of wood under the material you're carving up with the CNC. It has five "C" cross section extrusions embedded in it which can hold the heads of 1/4" bolts used to clamp the work piece. It's a nice improvement over simply using wood screws.
CNC Project (29 Jan 2015)
I've been nibbling away at the remaining unfinished items of the project. Four of the limit switches are in place as is the cable support which is just barely visible behind the gantry. In the side view you can see the power supply and motor driver. There is, however, a notable lack of wiring.


I need to mount the Z axis limit switch, make mounting brackets for the motor driver, and do a bit of wiring. Rather than just connect a power cord to the power supply, I've decided to use a power entry module with a switch and fuse. I've had a couple in the junk box for some time, but using one will require cutting a slightly larger hole in the back of the box. Eventually I'll need a door for the electronics bay, and a fan, and a power supply for the fan, and I'm sure other stuff.
None of this is hard. It's just time consuming and annoying, particularly so given that the project looks to be virtually finished, but really isn't.
Oh, and then there's the spoil board and clamps...
CNC Project (22 Jan 2015)
Some small but nontrivial progress on the CNC project: it's now beginning to look like a CNC machine.

Actually, the mechanical structure is 99% complete. I need to fabricate mounting brackets for the limit switches, but it's very nearly ready for wiring the electronics. There's a cover for controlling dust and noise, but I'll get to that later.
Writing and Still Here (11 Jan 2015)
RL somehow continues to make its demands. SLOW progress writing.
Still shipping copies of Building Recreational Flight Simulators.
Writing and CNC (24 July 2014)
Still alive, still writing, albeit not very fast or about flight sim.
I'm writing science fiction.
I'm writing a story that takes place on Sakura, a colony world several dozen light years from Earth. Sakura was settled by a robotic ark carrying frozen human genetic material on a very long voyage. No FTL travel in this story; these people are on their own. But that's okay, because they're doing just fine. They've made great progress adapting earth agriculture to Sakura's biome, they're well fed, and their population has grown enough to be counted in the millions (just barely). It's true they had a slight hiccup seventy years earlier when some nasty aliens began munching people at an agricultural research station, but three very clean, moderate yield nuclear sterilization devices put a stop to that. Now the incident's just an entry in their history books. Mostly.
One of the main characters is named Toss. Toss is a graduate student, an unhappy, underfunded graduate student. In fact he's so underfunded he's been forced into taking a lonely night job at an all but abandoned military research station on the edge of a nuclear blight, which is his initial reason for being unhappy.
Another main character doesn't have a name, doesn't even have a body you'd recognize. You could look right at her and not know it. Yes, "her", because she's a bringer of life (when she feels like it). Let's call her "Mama". Long ago Mama decided to make Sakura her home, but when she finally arrived she found others living there. She reached out to these others, but she was not well received. After seventy years she's going to try again.
You may think this is an obvious setup for one of those clichéd "don't go into the dark basement" horror stories, but it's not. The basement lights work great.
This is a story about several reasonably intelligent individuals each trying to do the proper thing, so everything should turn out fine…
Right?
Progress? Well, much further than my earlier efforts at fiction. The story's mapped out and the manuscript's approaching 50,000 words. Notes add several thousands more words. Call it half way to a first pass.
The CNC project is still alive though real life has conspired to bury it under assorted unidentified stuff in my work area. A bit of excavating and I should be able to resume assembling it.
Writing Fiction (24 April 2014)
I've been writing fiction on and off for years. Haven't managed to finish anything as yet. In part that's because there are so many really neat ideas to write about. I have bits and pieces of six novels, enough words to account for a good size novel, but unfortunately spread across a half dozen separate stories.
I decided to focus my efforts on one story to bring it to a close, which is what I'm doing these days. Since the weather is warming up, I'll perhaps also spend some time in my unheated workshop area completing my CNC project, and of course, I'm still shipping copies of Building Recreational Flight Simulators.