
Book Shipping and Collets (4 December 2013)
Books ordered (and paid for) during the Thanksgiving week holidays were shipped yesterday.
If you happen to pass through Seattle and have the time, consider stopping at the Museum of Flight at Boeing Field. They'll tell you three hours will be enough to see the whole thing. I was there longer and didn't get through it all. And of course, there's the Boeing tour north of Seattle.
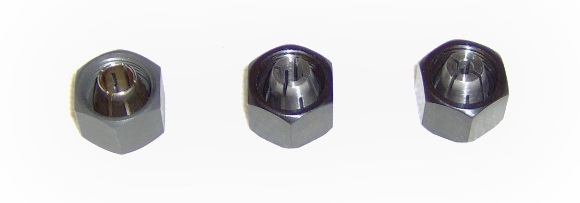
The collets I ordered for the router arrived. The router ships with a 1/4" collet. Many of the bits I expect to use will have 1/8" or 3/16" shafts. I ordered appropriately sized collets from Elaire. There are more precise collets available elsewhere (at a higher price), but based on comments posted on CNC Zone forum threads, I think these will do fine.
The collet on the left is the quarter inch unit that came with the router. The two to the right came from Elaire.

CNC Project (20 November 2013)
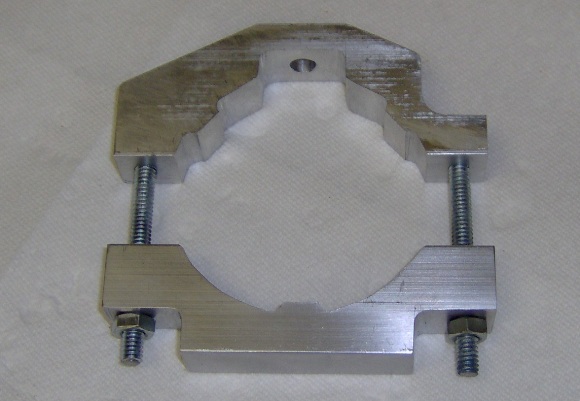
Here's a trial fitting of the router into the Z axis clamps.

I can see a couple of places on the clamps where I could have done better, but despite my less than perfect craftsmanship, the router seems firmly held in place. I'll make a few more tweaks here then add the Z axis motor and lead screw.
CNC Project (15 November 2013)
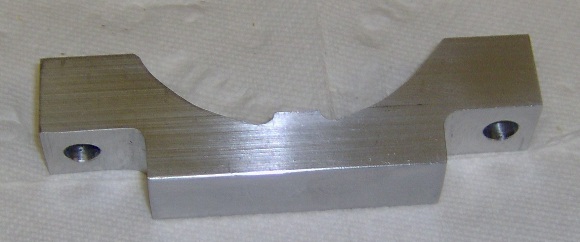
Here's the last of the four router mounting clamp pieces.

And here it is temporarily bolted to the Z-rail.
I still have the final fit and finish work to do on them.
CNC Project (10 November 2013)
Here's router mount number three.

One more to go.
CNC Project (5 November 2013)
The second router mount is (more or less) done.

There will be a few more tweaks to the fit and finish, but the bulk of the work is complete. Here's how it works with the first mount.
Two more to go.
CNC Project (1 November 2013)
Making the router mounts is time consuming. The raw material is 3/4" aluminum bar like this:

It must be turned into this:
I can make the straight cuts with a hacksaw. It's slow work, but not nearly as slow as making the curved cuts. Those require a sequence of drilled holes followed by a lot of filing.
This is the most simple one. Three more to go.
CNC Project (27 October 2013)
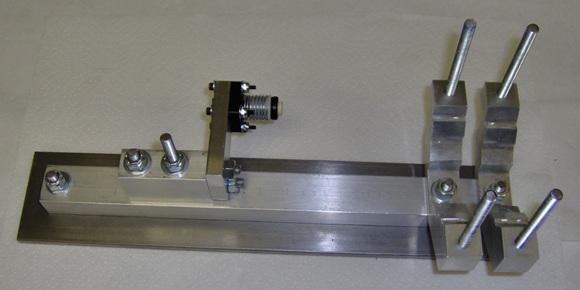
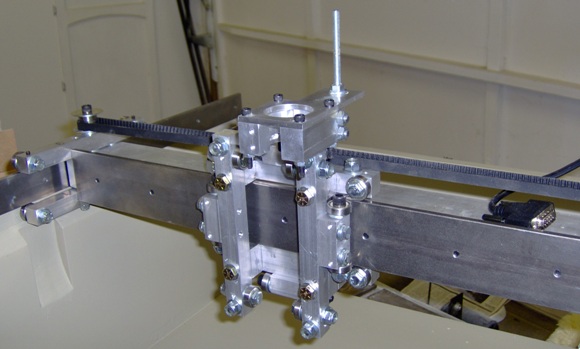
Here's the mostly assembled Z axis rail. The currently nonexistent router mounts will fasten to the two studs on the right end.

The Z axis rail is supported by the carriage. The rail is moved by a lead screw which will pass through the black Delrin anti-backlash nut.

CNC Project (21 October 2013)
Here are the parts for the Z axis update. The item in the upper left is a spacer which will shift the Z axis motor up to allow room for the coupler used between the motor shaft and threaded Z axis shaft. The item in the upper right is the plate which will support the thrust bearings. The bearings and the washers they run on are in the lower left. The black ring in the lower right is the collar which clamps onto the Z axis shaft.
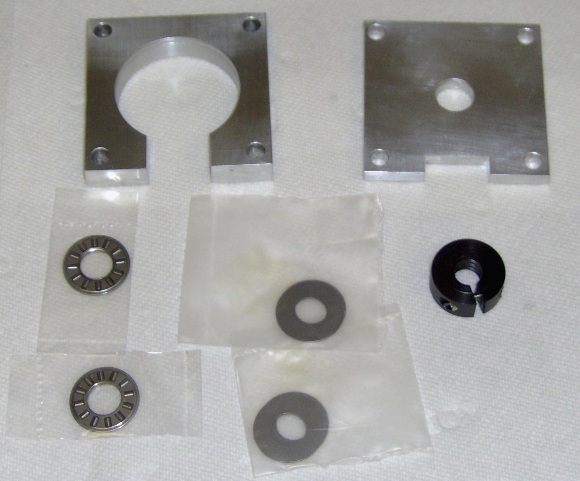
I made the spacer and thrust plate from aluminum. The bearings and washers are from VBX Bearings. The collar is a DumpsterCNC product.
What's missing is a set of longer motor mounting screws. The original 1.75" screws won't accomodate the spacer and plate.
CNC Project (19 October 2013)
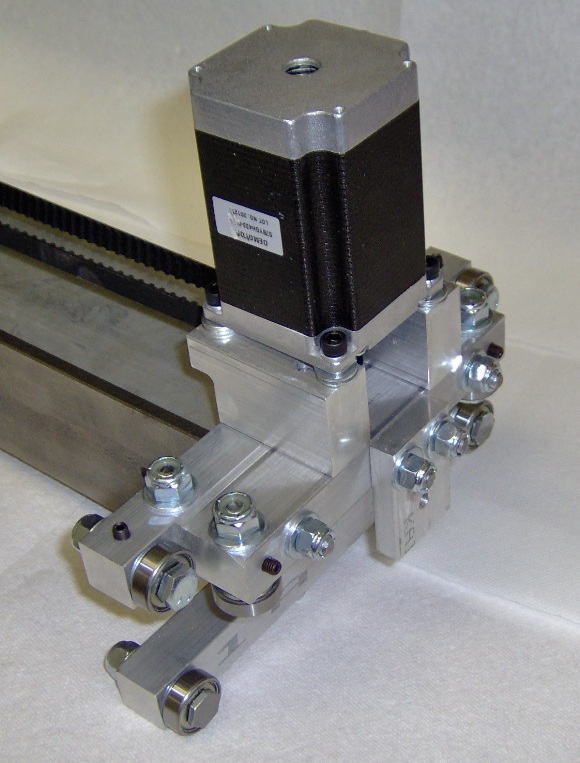
I've got the carriage mostly assembled. Bob, the designer, revised the Z axis to include a thrust bearing to support the weight of the router and Z rail. I don't have the new parts yet so I haven't mounted the Z axis motor on the carriage.

The carriage is quite a busy piece. It supports the Z axis motor in addition to the bearings that ride on the gantry and the bearings that support the Z axis rail.
Here's how it fits on the gantry.
My next steps are to make the pieces needed for the Z axis thrust bearing mod. And, at some point soon, I'll need to make the mounting clamps for the router.
CNC Project (13 October 2013)
The gantry is coming together. Here's a picture of it temporarily positioned on the base.

The motor on the right end of the gantry will eventually move the spindle carriage. The gantry will be moved by a motor hidden in the right side of the base.
An assortment of bearings support the gantry. Both ends of the gantry have bearings which carry vertical load, but only the right end has bearings carrying horizontal load. This arrangement prevents binding as the gantry moves fore and aft.

The bearing axel bolts pass through over size holes in the support arms. Set screws provide the means to adjust the bearing position before the axel bolts are tightened.
I'm running into some annoying interference problems. The steel bar which forms the rails the gantry rides on has a slight curve. I removed the curve by filing which made the rails slightly narrower. Tolerances are tight, and I now have two of the horizontal load bearings hitting the angle which supports the rail. It looks like the best solution is to trim the support angle, time consuming but doable.
CNC Project (10 October 2013)
I've finished the CNC base and the majority of the metal components. I'm now begining the assembly process. I've mounted the rails to the base.

I'm building this from a set of plans I bought from Bob Pavlik. I'm impressed. The design is well thought out. The plans are professionally done, and as improvements are made to the design, the updates are made available for free to people who bought earlier versions of the plans. CNC Zone hosts a forum for builders of this design. If you're considering a DIY CNC machine, take a look at this design.
Other Projects (8 September 2013)
For the past several months I've been focused on writing fiction. So, I'm not dead, just entertaining myself in another sandbox.
For those interested, I am still shipping flight sim books.
Computer Upgrade (13 May 2013)
I made what I hoped would be a minor upgrade to my computer, minor in the sense that I wouldn't have to rebuild the software on it. Win 7 has a moderate ability to load drivers when new hardware is found. I poked around the web looking for other peoples' experiences when upgrading a processor.
I found a mixed bag, some people were pleasantly surprised, others less so. Finally, I figured, what the hell, backed up my files and went for it.
The new processor called for a new motherboard which naturally needed lots of new drivers... sigh!
Oh, Win 7 tried really hard, or at least, it thought about it for a long time, but finally rolled over, put its metaphorical legs in the air, and said, "No joy for you today, sir."
So, I got to spend a day and a half loading software and watching my computer download updates and reboot. It could have been worse, I suppose. The system did activate without me having to make phone calls.
Hopefully, that's over for awhile.
Folded Projection Paths (21 Mar 2013)
I've been researching the use of fold mirrors in projection systems as part of the material for Building Immersive Display Systems.
Wrap-around panoramic projection systems present a real challenge in terms of delivering high contrast imagery. As the field of view increases, a wrap-around screen results in either end of the screen spilling light directly on the other end. Without proper care, image contrast suffers.
Badly.
A tried and true approach for front projection systems is to use a low gain screen. With today's high output projectors, you can use what would have been an unthinkably low gain a few years ago and still produce good image highlights.
Or, you can use a professional rear-projection screen to produce excellent contrast and highlights with a more moderate power projector. Professional screens are pricey, but the biggest issue is likely to be the space required for rear-projection throw paths.
That's why fold mirrors are attractive. Toss a few mirrors into the throw path and the space requirements become more manageable.
Unfortunately, there's a problem with the use of fold mirrors that's rarely mentioned on the game forums. It's called secondary reflection. That's when light from the back of a rear projection screen hits the fold mirror and is reflected back onto the screen where it tends to kill contrast.
Fortunately, secondary reflection is not unknown the professional A/V community. This problem has a straightforward solution, just make sure to angle the fold mirror enough with respect to the screen. The angle required to avoid secondary reflection depends on the distance between the mirror and screen, and there's an easy graphical technique for finding that angle.
I'm in the process of adding a description of this technique to the manuscript.
Chapter 1 Rewrite (11 Feb 2013)
I've completed a major rewrite of the first chapter of Building Immersive Display Systems. It's a much tighter chapter now, focusing on the factors important to building immersion.
I've also done a first pass re-structuring of the second chapter. I removed material which had become redundant as a result of the chapter one rewrite.
Postage (28 Jan 2013)
The US Postal Service raised prices today. I ship books using flat rate Priority and Priority International. These are basically airmail services which have been reasonably good choices for getting books to buyers in a timely fashion.
Now they just got more expensive.
I don't know of any better choice. Pay less and an international shipment can extend to months. Sigh!
So, if you're planning on buying a book anytime soon, right now is a really good time because very shortly I'll be digging into my Paypal "buy button" logic and bumping shipping up to match the new USPS prices.
Writing (16 Jan 2013)
I am in the process of refactoring the first two chapters of Building Immersive Display Systems. I'm surprised to find myself doing this, because after the last edit I was reasonably happy with what I had. Ah well, that's the value of putting something aside for a bit and looking at it with fresh eyes.
CNC Project Excuses and Writing (5 Jan 2013)
Well, I can't use lack of parts as an excuse for no progress on the CNC project. I'm probably missing a few things, but I've got quite enough on hand to do something. The problem is that I'm too comfortable inside where it's warm. My work area is neither warm nor comfortable. Eventually I'll get bored enough to venture into the cold and damp, but if not, spring is coming.
What I have done is pick up the manuscript for book 3 which I have officially renamed Building Immersive Display Systems. I had initially looked at the book as describing a functionality of simulators, but what it really has as its central thread is the use of display technology to boost immersion in virtual worlds, and that's not limited to simulators.
The manuscript as it stands contains a lot of good material. There continue to be developments in the industry that I'll add, but all in all, the book's loaded with goodies. I'm just not satisfied with how it's all presented. It's too easy to get lost in the details. That's something I need to fix.